python 协程

#生产者
def consumer():
    r = ''
    while True:
        n = yield r
        if not n:
            return
        print('[CONSUMER] Consuming %s...' % n)
        r = '200 OK'


def produce(c):
	#启动生成器
    c.send(None)
    n = 0
    while n < 5:
        n = n + 1
        print('[PRODUCER] Producing %s...' % n)

        #切换到consumer执行
        r = c.send(n)

        print('[PRODUCER] Consumer return: %s' % r)
    c.close()

c = consumer()
produce(c)

注意到consumer函数是一个generator,把一个consumer传入produce后:

1. 首先调用c.send(None)启动生成器;

2. 然后,一旦生产了东西,通过c.send(n)切换到consumer执行;

3. consumer通过yield拿到消息,处理,又通过yield把结果传回;

4. produce拿到consumer处理的结果,继续生产下一条消息;

5. produce决定不生产了,通过c.close()关闭consumer,整个过程结束。

整个流程无锁,由一个线程执行,produce和consumer协作完成任务,所以称为“协程”,而非线程的抢占式多任务。

python 多线程

import time, threading

#新线程执行的代码:
def loop():
	print('thread %s is running...' % threading.current_thread().name)
	n = 0
	while n < 5:
		n = n + 1
		print('thread %s >>> %s' % (threading.current_thread().name, n))
		time.sleep(1)
	print('thread %s ended.' % threading.current_thread().name)

print('thread %s is running...' % threading.current_thread().name)
t1 = threading.Thread(target=loop, name='LoopThread1')
t1.start()
t2 = threading.Thread(target=loop, name='LoopThread2')
t2.start()
t3 = threading.Thread(target=loop, name='LoopThread3')
t3.start()
t4 = threading.Thread(target=loop, name='LoopThread4')
t4.start()

t1.join()
t2.join()
t3.join()
t4.join()
print('thread %s ended.' % threading.current_thread().name)

image.png

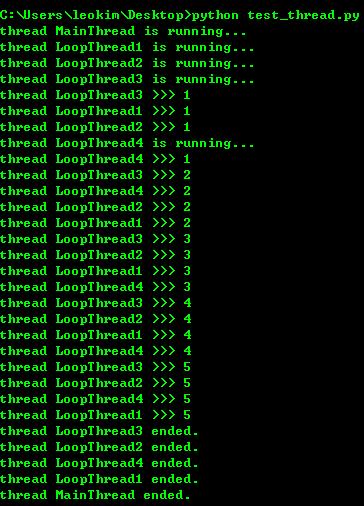
由于任何进程默认就会启动一个线程,我们把该线程称为主线程,主线程又可以启动新的线程,Python的threading模块有个current_thread()函数,它永远返回当前线程的实例。主线程实例的名字叫MainThread,子线程的名字在创建时指定,我们用LoopThread命名子线程。名字仅仅在打印时用来显示,完全没有其他意义,如果不起名字Python就自动给线程命名为Thread-1,Thread-2……

Lock

多线程和多进程最大的不同在于,多进程中,同一个变量,各自有一份拷贝存在于每个进程中,互不影响,而多线程中,所有变量都由所有线程共享,所以,任何一个变量都可以被任何一个线程修改,因此,线程之间共享数据最大的危险在于多个线程同时改一个变量,把内容给改乱了。来看看多个线程同时操作一个变量怎么把内容给改乱了:

import time, threading

#假定这是你的银行存款:
balance = 0

def change_it(n):
	#先存后取,结果应该为0:
	global balance
	balance = balance + n
	balance = balance - n

def run_thread(n):
	for i in range(100000):
		change_it(n)

t1 = threading.Thread(target=run_thread, args=(5,))
t2 = threading.Thread(target=run_thread, args=(8,))
t1.start()
t2.start()
t1.join()
t2.join()
print(balance)

结果跑出来会不一样,可以给线程加lock解决问题 因为这个现在还不怎么用到 所以就不深究了 可以在这里查看

http://www.liaoxuefeng.com/wiki/0014316089557264a6b348958f449949df42a6d3a2e542c000/00143192823818768cd506abbc94eb5916192364506fa5d000

python多进程

创建子进程

from  multiprocessing import Process
import os

#子进程要执行的代码
def run_proc(name):
    print('Run child process %s (%s)...' % (name, os.getpid()))

if __name__=='__main__':
 	print('Parent process %s.' % os.getpid())
 	p = Process(target=run_proc, args=('test',))
 	print('Child process will start.')
 	p.start()
 	p.join()
 	print('Child process end.')

image.png

用Process来创建子进程

Process([group [, target [, name [, args [, kwargs]]]]]) 

target表示调用对象,args表示调用对象的位置参数元组。kwargs表示调用对象的字典。Name为别名。Group实质上不使用。

进程池

from multiprocessing import Pool
import os, time, random

def log_time_task(name):
	print('Run task %s (%s)...' % (name, os.getpid()))
	start = time.time()
	time.sleep(random.random()*3)
	end = time.time()
	print('Task %s runs %0.2f seconds.' % (name, (end-start)))

if __name__=='__main__':
	print('Parent process %s.' % os.getpid())
	#pool默认大小是cpu核数
	p = Pool(4)
	for i in range(5):
		#pool.apply_async()用来向进程池提交目标请求
		p.apply_async(log_time_task, args=(i,))
	print('Wating for all subprocess done.')
	p.close()
	#pool.join()是用来等待进程池中的worker进程执行完毕,防止主进程在worker进程结束前结束.
	#但pool.join()必须使用在pool.close()或者pool.terminate()之后.
	#其中close()跟terminate()的区别在于close()会等待池中的worker进程执行结束再关闭pool,而terminate()则是直接关闭.
	p.join()
	print('All subprocesses done.')

	#result.successful()表示整个调用执行的状态,如果还有worker没有执行完,则会抛出AssertionError异常。
	#利用multiprocessing下的Pool可以很方便的同时自动处理几百或者上千个并行操作,脚本的复杂性也大大降低。

image.png

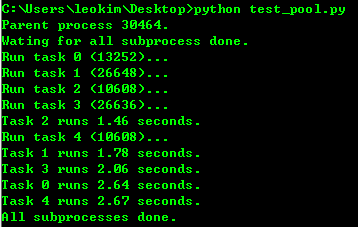
pool默认大小是cpu核数

pool.join()是用来等待进程池中的worker进程执行完毕,防止主进程在worker进程结束前结束. 

但pool.join()必须使用在pool.close()或者pool.terminate()之后. 

其中close()跟terminate()的区别在于close()会等待池中的worker进程执行结束再关闭pool,而terminate()则是直接关闭.

result.successful()表示整个调用执行的状态,如果还有worker没有执行完,则会抛出AssertionError异常。 

利用multiprocessing下的Pool可以很方便的同时自动处理几百或者上千个并行操作,脚本的复杂性也大大降低。

子进程

很多时候子进程并不是自身,而是一个外部进程。我们创建了子进程后,还需要进程的输入和输出。

subprocess模块可以让我们非常方便的启动一个子进程,然后控制其输入输出。

进程间通信

http://www.liaoxuefeng.com/wiki/0014316089557264a6b348958f449949df42a6d3a2e542c000/001431927781401bb47ccf187b24c3b955157bb12c5882d000

python字符串前面加u,r,b的含义

u/U:表示unicode字符串 
不是仅仅是针对中文, 可以针对任何的字符串,代表是对字符串进行unicode编码。 
一般英文字符在使用各种编码下, 基本都可以正常解析, 所以一般不带u;但是中文, 必须表明所需编码, 否则一旦编码转换就会出现乱码。 
建议所有编码方式采用utf8

r/R:非转义的原始字符串 
与普通字符相比,其他相对特殊的字符,其中可能包含转义字符,即那些,反斜杠加上对应字母,表示对应的特殊含义的,比如最常见的”\n”表示换行,”\t”表示Tab等。而如果是以r开头,那么说明后面的字符,都是普通的字符了,即如果是“\n”那么表示一个反斜杠字符,一个字母n,而不是表示换行了。 
以r开头的字符,常用于正则表达式,对应着re模块。

b:bytes 
python3.x里默认的str是(py2.x里的)unicode, bytes是(py2.x)的str, b”“前缀代表的就是bytes 
python2.x里, b前缀没什么具体意义, 只是为了兼容python3.x的这种写法

Python3 第三方库记录

记录一些不熟的 python3 的第三方库

不定时更新

Requests

Requests 是用Python语言编写,基于 urllib,采用 Apache2 Licensed 开源协议的 HTTP 库。它比 urllib 更加方便,可以节约我们大量的工作,完全满足 HTTP 测试需求。Requests 的哲学是以 PEP 20 的习语为中心开发的,所以它比 urllib 更加 Pythoner。更重要的一点是它支持 Python3 哦

使用方法:http://blog.csdn.net/shanzhizi/article/details/50903748

======================================================================================

monkey patch

http://blog.leokim.cn/2017/05/15/%E7%8C%B4%E5%AD%90%E8%A1%A5%E4%B8%81monkey-patch/

http://www.liaoxuefeng.com/wiki/001374738125095c955c1e6d8bb493182103fac9270762a000/001407503089986d175822da68d4d6685fbe849a0e0ca35000

======================================================================================

gevent

gevent是基于协程的Python网络库

包含的特性:

1.基于libev的快速事件循环

2.基于greenlet的轻量级执行单元

3.重用Python标准库且概念相似的API

4.支持SSL的协作socket

5.通过c-ares或者线程池进行DNS查询

6.使用标准库和第三方库中使用了阻塞socket的代码的能力

支持Python版本:

>=2.6 和>=3.3

gevent是Python世界中最重要的异步网络库,可以大幅度提高系统的性能。最可贵的是,它允许我们几乎不修改代码,把同步程序变为异步程序。使用的技术就是我们之前讲过的monkey patch。

======================================================================================

asyncio

asyncio是在python3.4中被引进的异步IO库。

你也可以通过python3.3的pypi来安装它。

它相当的复杂,而且我不会介绍太多的细节。

相反,我将会解释你需要知道些什么,以利用它来写异步的代码。 

简而言之,有两件事情你需要知道:协同程序和事件循环。

协同程序像是方法,但是它们可以在代码中的特定点暂停和继续。

当在等待一个IO(比如一个HTTP请求),同时执行另一个请求的时候,可以用来暂停一个协同程序。

我们使用关键字yield from来设定一个状态,表明我们需要一个协同程序的返回值。

而事件循环则被用来安排协同程序的执行。

======================================================================================

Logging

This module defines functions and classes which implement a flexible event logging system for applications and libraries.

The key benefit of having the logging API provided by a standard library module is that all Python modules can participate in logging, so your application log can include your own messages integrated with messages from third-party modules.

======================================================================================

ghost


这个库以前用过,能等页面所有的ajax返回完毕之后在爬取页面

pornhub爬虫

看到有人用2.7写了一个然后我想我用3写一个吧 

本来以为爬下的720P的路径有用呢 后来爬了块1W条信息之后才发现 原来只是个CDN链接

每过一段时间视频后面的参数就会变掉 如果参数不对 视频就没有办法访问到

先当练手吧 后面要做的话 就不抓全部了 每天监控首页前10好了

把每天的前10 DWON下来

#! /usr/bin/env python
# -*- coding:utf8 -*-
# __author__="leokim"
from bs4 import BeautifulSoup

import re
from html.parser import HTMLParser
import urllib.request, urllib.parse, http.cookiejar
import http.cookiejar
import string
import codecs
import time
import pymysql
import json

conn=pymysql.connect(host='localhost',user='root',passwd='superhero',db='python_test',port=3306,charset='utf8')
cur=conn.cursor()#获取一个游标

hosturl = 'https://www.pornhub.com'
login_url = 'https://www.pornhub.com/front/authenticate'


def do_login(login_url):
	headers = {
		'Accept':'application/json, text/javascript, */*; q=0.01',
		'Accept-Encoding':'gzip, deflate, br',
		'Accept-Language':'zh-CN,zh;q=0.8,en;q=0.6',
		'Connection':'keep-alive',
		'Content-Length':'228',
		'Content-Type':'application/x-www-form-urlencoded; charset=UTF-8',
		'Cookie':'platform=pc; ss=552610383637701883; bs=09uvdhtd0plqvxtywxkan6d3u9aahn2f; RNLBSERVERID=ded6752; FastPopSessionRequestNumber=1; desired_username=iamsuperhero%7Cjl6668029%40sina.com; performance_timing=home; expiredEnterModalShown=1; _gat=1; _ga=GA1.2.1975907893.1494638097; _gid=GA1.2.1534576924.1494686000; FPSRN=1',
		'Host':'www.pornhub.com',
		'Origin':'https://www.pornhub.com',
		'Referer':'https://www.pornhub.com/login',
		'User-Agent':'Mozilla/5.0 (Windows NT 6.1; Win64; x64) AppleWebKit/537.36 (KHTML, like Gecko) Chrome/58.0.3029.110 Safari/537.36',
		'X-Requested-With':'XMLHttpRequest'
	}

	postData = {'loginPage': '1',
	            'redirect': 'RF9jCo8gyhc9dJlS3QxiVEXNRoQCaw8_FuezIgPRrCQ.',
	            'token': 'MTQ5NDY4NTk0OUGXghl0xCEzQMdNs0i7F3J0fV51kVyaf8XXuqe-IBB7f75TJKnNC0tDnS9uh4r1yC8SSDcZ27q-HIkNAOWrdyo.',
	            'username': 'iamsuperhero',
	            'password': '281274954',
	            'remember_me' : 'on'
	            }

	postData = urllib.parse.urlencode(postData).encode('utf-8');

	request = urllib.request.Request(login_url, postData, headers)
	response = urllib.request.urlopen(request)

def get_page_soup(hosturl):
	try:
		cj = http.cookiejar.CookieJar()
		opener = urllib.request.build_opener(urllib.request.HTTPCookieProcessor(cj))
		opener.addheaders = [('User-Agent','Mozilla/5.0 (Windows NT 6.1; WOW64) AppleWebKit/537.36 (KHTML, like Gecko) Chrome/41.0.2272.101 Safari/537.36'),
		    ('Cookie', 'platform=pc; ss=552610383637701883; bs=09uvdhtd0plqvxtywxkan6d3u9aahn2f; RNLBSERVERID=ded6752; FastPopSessionRequestNumber=1; desired_username=iamsuperhero%7Cjl6668029%40sina.com; performance_timing=home; _gat=1; _ga=GA1.2.1975907893.1494638097; _gid=GA1.2.1534576924.1494686000; FPSRN=1; il=v11aG6sqWdiUQBzr4O6rEiEnSCWKAR3eEfgwd6hvbe1GAxNDk3MzY0MzY1MzI3MDY0MzkxO1VpbUxtSmlvUDJPZUZtNFZoN19kQVBkS05mcTNEdF84cXZJRVdDajM1eVUu; expiredEnterModalShown=1')]


		urllib.request.install_opener(opener)
		html_bytes = urllib.request.urlopen(hosturl).read()
		html_string = html_bytes.decode('utf-8')

		return BeautifulSoup(html_string, 'html.parser')
	except:
		return False
	

def get_video_list(soup):
	try:
		video_boxs = soup.find("ul",class_="search-video-thumbs").find_all("",class_="videoBox")
		for video in video_boxs:
			a = video.find("a")
			url = hosturl+a["href"];
			img = a.find("img")

			img_src = img["data-mediumthumb"]
			img_media = img["data-mediabook"]
			video_720p = get_video_hd_addr(url)

			#插入数据库
			sql = "INSERT INTO `pornhub` (`url`,`img_src`,`img_media`,`video_720p`) VALUES (%s,%s,%s,%s)"
			cur.execute(sql, (url,img_src,img_media,video_720p))
	except:
		return 'error'

		# print('###################################################')
		# print(img_src)
		# print(img_media)
		# print(video_720p)
		# print('###################################################')

def get_next_page_url(soup):
	#page_next
	last_page_a = soup.find("li",class_="page_next")
	if(last_page_a is not None):
		a = last_page_a.find("a")
		href = a["href"]
		return href
	else:
		return False

def check_login(check_url):
	soup = get_page_soup(check_url)
	notification = soup.find(id="notificationIcons")
	return notification


def get_video_hd_addr(video_url):
	print(video_url)
	soup = get_page_soup(video_url)
	a_list = soup.find_all("a",class_="downloadBtn")
	for a in a_list:
		if(a.contents[2].strip() == '720p'):
			return a["href"]
			

video_page_url = hosturl+'/video?hd=1&page=1'

#登录验证
if(check_login(video_page_url)):
	print('状态: 已登录.')
	print('=============================')
else:
	do_login(login_url)


url = hosturl+'/video?hd=1&page=1'
tag=True
while(tag):
	soup = get_page_soup(url)

	if(soup):
		next_page_url = get_next_page_url(soup)
		if(next_page_url):
			get_video_list(soup)
			# video_list = get_video_list(soup)
			# for video_page in video_list:
			# 	print(video_page)
			url = hosturl+next_page_url
		else:
			tag=False
			print('程序执行完毕.')
	

Beautiful Soup 常用笔记

记一些bs4常用的东西

终点是后面的css选择器 很方便

对象的种类

1.Tag

2.NavigableString

3.BeautifulSoup

4.Comment


Tag

tag对象与XML或HTML原生文档中的tag相同,主要属性是name,attributes

tag.name
#u'b'

一个tag可能有很多个属性. tag <b class="boldest"> 有一个 “class” 的属性,值为 “boldest” . tag的属性的操作方法与字典相同:

tag['class']# u'boldest'

也可以直接”点”取属性, 比如: .attrs :

tag.attrs# {u'class': u'boldest'}

tag的属性可以被添加,删除或修改. tag的属性操作方法与字典一样

tag['class'] = 'verybold'
tag['id'] = 1
tag
# <blockquote class="verybold" id="1">Extremely bold</blockquote>

del tag['class']
del tag['id']
tag
# <blockquote>Extremely bold</blockquote>

tag['class']
# KeyError: 'class'
print(tag.get('class'))
# None

NavigableString 

BeautifulSoup用NavigableString 来包装tag中的字符串

tag.string
# u'Extremely bold'
type(tag.string)
# <class 'bs4.element.NavigableString'>

一个 NavigableString 字符串与Python中的Unicode字符串相同,并且还支持包含在 遍历文档树 和 搜索文档树 中的一些特性. 通过 unicode() 方法可以直接将 NavigableString对象转换成Unicode字符串

BeautifulSoup

BeautifulSoup 对象表示的是一个文档的全部内容.大部分时候,可以把它当作 Tag 对象,它支持 遍历文档树 和 搜索文档树 中描述的大部分的方法.

因为 BeautifulSoup 对象并不是真正的HTML或XML的tag,所以它没有name和attribute属性.但有时查看它的 .name 属性是很方便的,所以 BeautifulSoup 对象包含了一个值为 “[document]” 的特殊属性 .name

soup.name
# u'[document]'

遍历文档树

一个Tag可能包含多个字符串或其它的Tag,这些都是这个Tag的子节点.Beautiful Soup提供了许多操作和遍历子节点的属性.

注意: Beautiful Soup中字符串节点不支持这些属性,因为字符串没有子节点

.contents 和 .children

tag的 .contents 属性可以将tag的子节点以列表的方式输出:

我觉得不太好用

还不如直接find_all之后for出来呢

parent

获取父节点

兄弟节点 —  .next_sibling 和 .previous_sibling

find_all()

find_all( name , attrs , recursive , string , **kwargs )

find_all() 方法搜索当前tag的所有tag子节点,并判断是否符合过滤器的条件.这里有几个例子:

soup.find_all("title")
# [<title>The Dormouse's story</title>]

soup.find_all("p", "title")
# [<p class="title"><b>The Dormouse's story</b></p>]

soup.find_all("a")
# [<a class="sister" href="http://example.com/elsie" id="link1">Elsie</a>,
#  <a class="sister" href="http://example.com/lacie" id="link2">Lacie</a>,
#  <a class="sister" href="http://example.com/tillie" id="link3">Tillie</a>]

soup.find_all(id="link2")
# [<a class="sister" href="http://example.com/lacie" id="link2">Lacie</a>]

import re
soup.find(string=re.compile("sisters"))
# u'Once upon a time there were three little sisters; and their names were\n'

有几个方法很相似,还有几个方法是新的,参数中的 string 和 id 是什么含义? 为什么 find_all("p", "title") 返回的是CSS Class为”title”的<p>标签? 我们来仔细看一下 find_all() 的参数

soup.find_all(id='link2')
# [<a class="sister" href="http://example.com/lacie" id="link2">Lacie</a>]

如果传入 href 参数,Beautiful Soup会搜索每个tag的”href”属性:

soup.find_all(href=re.compile("elsie"))
# [<a class="sister" href="http://example.com/elsie" id="link1">Elsie</a>]

搜索指定名字的属性时可以使用的参数值包括 字符串 , 正则表达式 , 列表, True .

下面的例子在文档树中查找所有包含 id 属性的tag,无论 id 的值是什么:

soup.find_all(id=True)
# [<a class="sister" href="http://example.com/elsie" id="link1">Elsie</a>,
#  <a class="sister" href="http://example.com/lacie" id="link2">Lacie</a>,
#  <a class="sister" href="http://example.com/tillie" id="link3">Tillie</a>]

使用多个指定名字的参数可以同时过滤tag的多个属性:

soup.find_all(href=re.compile("elsie"), id='link1')
# [<a class="sister" href="http://example.com/elsie" id="link1">three</a>]

有些tag属性在搜索不能使用,比如HTML5中的 data-* 属性:

data_soup = BeautifulSoup('<div data-foo="value">foo!</div>')
data_soup.find_all(data-foo="value")
# SyntaxError: keyword can't be an expression

但是可以通过 find_all() 方法的 attrs 参数定义一个字典参数来搜索包含特殊属性的tag:

data_soup.find_all(attrs={"data-foo": "value"})# [<div data-foo="value">foo!</div>]

按CSS搜索

按照CSS类名搜索tag的功能非常实用,但标识CSS类名的关键字 class 在Python中是保留字,使用 class 做参数会导致语法错误.从Beautiful Soup的4.1.1版本开始,可以通过 class_参数搜索有指定CSS类名的tag:

soup.find_all("a", class_="sister")
# [<a class="sister" href="http://example.com/elsie" id="link1">Elsie</a>,
#  <a class="sister" href="http://example.com/lacie" id="link2">Lacie</a>,
#  <a class="sister" href="http://example.com/tillie" id="link3">Tillie</a>]

class_ 参数同样接受不同类型的 过滤器 ,字符串,正则表达式,方法或 True :

soup.find_all(class_=re.compile("itl"))
# [<p class="title"><b>The Dormouse's story</b></p>]

def has_six_characters(css_class):
    return css_class is not None and len(css_class) == 6

#这TM也行???我惊了
soup.find_all(class_=has_six_characters)
# [<a class="sister" href="http://example.com/elsie" id="link1">Elsie</a>,
#  <a class="sister" href="http://example.com/lacie" id="link2">Lacie</a>,
#  <a class="sister" href="http://example.com/tillie" id="link3">Tillie</a>]

tag的 class 属性是 多值属性 .按照CSS类名搜索tag时,可以分别搜索tag中的每个CSS类名:

css_soup = BeautifulSoup('<p class="body strikeout"></p>')
css_soup.find_all("p", class_="strikeout")
# [<p class="body strikeout"></p>]

css_soup.find_all("p", class_="body")
# [<p class="body strikeout"></p>]

搜索 class 属性时也可以通过CSS值完全匹配:

css_soup.find_all("p", class_="body strikeout")
# [<p class="body strikeout"></p>]

完全匹配 class 的值时,如果CSS类名的顺序与实际不符,将搜索不到结果:

soup.find_all("a", attrs={"class": "sister"})
# [<a class="sister" href="http://example.com/elsie" id="link1">Elsie</a>,
#  <a class="sister" href="http://example.com/lacie" id="link2">Lacie</a>,
#  <a class="sister" href="http://example.com/tillie" id="link3">Tillie</a>]

string 参数

我看了文档之后还真发现这个参数其实还是有些用处的,比如说直接在find/find_all里通过匹配或者正则搜索string,好像有点逆天····

通过 string 参数可以搜搜文档中的字符串内容.与 name 参数的可选值一样, string 参数接受 字符串 , 正则表达式 , 列表, True . 看例子:

soup.find_all(string="Elsie")
# [u'Elsie']

soup.find_all(string=["Tillie", "Elsie", "Lacie"])
# [u'Elsie', u'Lacie', u'Tillie']

soup.find_all(string=re.compile("Dormouse"))
[u"The Dormouse's story", u"The Dormouse's story"]

def is_the_only_string_within_a_tag(s):
    ""Return True if this string is the only child of its parent tag.""
    return (s == s.parent.string)

soup.find_all(string=is_the_only_string_within_a_tag)
# [u"The Dormouse's story", u"The Dormouse's story", u'Elsie', u'Lacie', u'Tillie', u'...']

虽然 string 参数用于搜索字符串,还可以与其它参数混合使用来过滤tag.Beautiful Soup会找到 .string 方法与 string 参数值相符的tag.下面代码用来搜索内容里面包含“Elsie”的<a>标签:

soup.find_all("a", string="Elsie")
# [<a href="http://example.com/elsie" class="sister" id="link1">Elsie</a>]

其他的参数还有limit,recursive参数

limit就是在find里直接加上limit=n很简单

recursive:调用tag的 find_all() 方法时,Beautiful Soup会检索当前tag的所有子孙节点,如果只想搜索tag的直接子节点,可以使用参数 recursive=False .

最好用的应该还是CSS选择器 我到目前还没怎么用过 下次写爬虫的时候一定要用了熟悉一下

CSS选择器

Beautiful Soup支持大部分的CSS选择器 http://www.w3.org/TR/CSS2/selector.html , 在 Tag 或 BeautifulSoup 对象的 .select() 方法中传入字符串参数, 即可使用CSS选择器的语法找到tag:

select 返回的是一个tag的list CSS选择器用select这个太方便了!!!!!

soup.select("title")
# [<title>The Dormouse's story</title>]

soup.select("p nth-of-type(3)")
# [<p class="story">...</p>]

通过tag标签逐层查找:

soup.select("body a")
# [<a class="sister" href="http://example.com/elsie" id="link1">Elsie</a>,
#  <a class="sister" href="http://example.com/lacie"  id="link2">Lacie</a>,
#  <a class="sister" href="http://example.com/tillie" id="link3">Tillie</a>]

soup.select("html head title")
# [<title>The Dormouse's story</title>]

找到某个tag标签下的直接子标签:

soup.select("head > title")
# [<title>The Dormouse's story</title>]

soup.select("p > a")
# [<a class="sister" href="http://example.com/elsie" id="link1">Elsie</a>,
#  <a class="sister" href="http://example.com/lacie"  id="link2">Lacie</a>,
#  <a class="sister" href="http://example.com/tillie" id="link3">Tillie</a>]

soup.select("p > a:nth-of-type(2)")
# [<a class="sister" href="http://example.com/lacie" id="link2">Lacie</a>]

soup.select("p > #link1")
# [<a class="sister" href="http://example.com/elsie" id="link1">Elsie</a>]

soup.select("body > a")
# []

找到兄弟节点标签:

soup.select("#link1 ~ .sister")
# [<a class="sister" href="http://example.com/lacie" id="link2">Lacie</a>,
#  <a class="sister" href="http://example.com/tillie"  id="link3">Tillie</a>]

soup.select("#link1 + .sister")
# [<a class="sister" href="http://example.com/lacie" id="link2">Lacie</a>]

通过CSS的类名查找:

soup.select(".sister")
# [<a class="sister" href="http://example.com/elsie" id="link1">Elsie</a>,
#  <a class="sister" href="http://example.com/lacie" id="link2">Lacie</a>,
#  <a class="sister" href="http://example.com/tillie" id="link3">Tillie</a>]

soup.select("[class~=sister]")
# [<a class="sister" href="http://example.com/elsie" id="link1">Elsie</a>,
#  <a class="sister" href="http://example.com/lacie" id="link2">Lacie</a>,
#  <a class="sister" href="http://example.com/tillie" id="link3">Tillie</a>]

通过tag的id查找:

soup.select("#link1")
# [<a class="sister" href="http://example.com/elsie" id="link1">Elsie</a>]

soup.select("a#link2")
# [<a class="sister" href="http://example.com/lacie" id="link2">Lacie</a>]

同时用多种CSS选择器查询元素:

soup.select("#link1,#link2")
# [<a class="sister" href="http://example.com/elsie" id="link1">Elsie</a>,
#  <a class="sister" href="http://example.com/lacie" id="link2">Lacie</a>]

通过是否存在某个属性来查找:

soup.select('a[href]')
# [<a class="sister" href="http://example.com/elsie" id="link1">Elsie</a>,
#  <a class="sister" href="http://example.com/lacie" id="link2">Lacie</a>,
#  <a class="sister" href="http://example.com/tillie" id="link3">Tillie</a>]

通过属性的值来查找:

soup.select('a[href="http://example.com/elsie"]')
# [<a class="sister" href="http://example.com/elsie" id="link1">Elsie</a>]

soup.select('a[href^="http://example.com/"]')
# [<a class="sister" href="http://example.com/elsie" id="link1">Elsie</a>,
#  <a class="sister" href="http://example.com/lacie" id="link2">Lacie</a>,
#  <a class="sister" href="http://example.com/tillie" id="link3">Tillie</a>]

soup.select('a[href$="tillie"]')
# [<a class="sister" href="http://example.com/tillie" id="link3">Tillie</a>]

soup.select('a[href*=".com/el"]')
# [<a class="sister" href="http://example.com/elsie" id="link1">Elsie</a>]

基本上用到这些就差不多了 后面有觉得重要的再补充进来

测试文件:

#! /usr/bin/env python
# -*- coding:utf8 -*-
# __author__="leokim"

from bs4 import BeautifulSoup

html_doc = """
<html><head><title>The Dormouse's story</title></head>
    <body>
<p class="title"><b>The Dormouse's story</b></p>

<p class="story">Once upon a time there were three little sisters; and their names were
<a href="http://example.com/elsie" class="sister" id="link1">Elsie</a>,
<a href="http://example.com/lacie" class="sister" id="link2">Lacie</a> and
<a href="http://example.com/tillie" class="sister" id="link3">Tillie</a>;
and they lived at the bottom of a well.</p>

<p class="story">...</p>
"""

soup = BeautifulSoup(html_doc, 'html.parser')

#print(type(soup))
#<class 'bs4.BeautifulSoup'>

#print(type(soup.head))
#<class 'bs4.element.Tag'>

#print(type(soup.title))
#<class 'bs4.element.Tag'>


# print(soup.title.string)
#The Dormouse's story
#看来Tag是有string属性的

#print(type(soup.title.string))
#<class 'bs4.element.NavigableString'>

#print(soup.find_all('a'))
#[<a class="sister" href="http://example.com/elsie" id="link1">Elsie</a>, <a clas
#s="sister" href="http://example.com/lacie" id="link2">Lacie</a>, <a class="siste
#r" href="http://example.com/tillie" id="link3">Tillie</a>]

#print(type(soup.find_all('a')))
#<class 'bs4.element.ResultSet'>

#print(type(soup.find('a')))
#<class 'bs4.element.Tag'>
#find返回的是Tag 而 find_all返回的是ResultSet

# for a in soup.find_all('a'):
# 	print(type(a))
# 	print(a.string)
#<class 'bs4.element.Tag'>
#ResoultSet 是Tag的集合可以通过for把Tag单独拿出来之后进行tag相关的操作
#所以我之前用了find_all("xxx").find_all('xxx')是解析不出来的,应该要单独把Tag循环出来操作


#print(type(soup.find('a').string))
#<class 'bs4.element.NavigableString'>

#title_tag = soup.title
#print(title_tag.parent)
#<head><title>The Dormouse's story</title></head>


data_soup = BeautifulSoup('<div data-foo="value">foo!</div>')
data_soup.find_all("data-foo"="value")

通过语言设置来查找:

multilingual_markup = """
 <p>Hello</p>
 <p>Howdy, y'all</p>
 <p>Pip-pip, old fruit</p>
 <p>Bonjour mes amis</p>
"""
multilingual_soup = BeautifulSoup(multilingual_markup)
multilingual_soup.select('p[lang|=en]')
# [<p>Hello</p>,
#  <p>Howdy, y'all</p>,
#  <p>Pip-pip, old fruit</p>]

返回查找到的元素的第一个

soup.select_one(".sister")
# <a class="sister" href="http://example.com/elsie" id="link1">Elsie</a>

对于熟悉CSS选择器语法的人来说这是个非常方便的方法.Beautiful Soup也支持CSS选择器API, 如果你仅仅需要CSS选择器的功能,那么直接使用 lxml 也可以, 而且速度更快,支持更多的CSS选择器语法,但Beautiful Soup整合了CSS选择器的语法和自身方便使用API.
python中的urlencode与urldecode

当url地址含有中文,或者参数有中文的时候,这个算是很正常了,但是把这样的url作为参数传递的时候(最常见的callback),需要把一些中文甚至'/'做一下编码转换。

一、urlencode

urllib库里面有个urlencode函数,可以把key-value这样的键值对转换成我们想要的格式,返回的是a=1&b=2这样的字符串,比如:

>>> from urllib import urlencode 
>>> data = { 
... 'a': 'test', 
... 'name': '魔兽' 
... } 
>>> print urlencode(data) 
a=test&amp;name=%C4%A7%CA%DE

如果只想对一个字符串进行urlencode转换,怎么办?urllib提供另外一个函数:quote()

>>> from urllib import quote 
>>> quote('魔兽') 
'%C4%A7%CA%DE'

二、urldecode

当urlencode之后的字符串传递过来之后,接受完毕就要解码了——urldecode。urllib提供了unquote()这个函数,可没有urldecode()!

>>> from urllib import unquote 
>>> unquote('%C4%A7%CA%DE') '\xc4\xa7\xca\xde' 
>>> print unquote('%C4%A7%CA%DE') 
魔兽

三、讨论

在做urldecode的时候,看unquote()这个函数的输出,是对应中文在gbk下的编码,在对比一下quote()的结果不难发现,所谓的urlencode就是把字符串转车gbk编码,然后把\x替换成%。如果你的终端是utf8编码的,那么要把结果再转成utf8输出,否则就乱码。

可以根据实际情况,自定义或者重写urlencode()、urldecode()等函数。

python爬虫练手

51无聊谢了个爬虫玩

python写这类小东西真的很方便

__author__='LeoKim'
from bs4 import BeautifulSoup
 
import re
import urllib.request, urllib.parse, http.cookiejar
import json
import time
import pymysql

conn=pymysql.connect(host='localhost',user='root',passwd='superhero',db='python_test',port=3306,charset='utf8')
cur=conn.cursor()#获取一个游标

#通过链接获取每页的小区名
def getVillage(url):
	cj = http.cookiejar.CookieJar()
	opener = urllib.request.build_opener(urllib.request.HTTPCookieProcessor(cj))
	opener.addheaders = [('User-Agent','Mozilla/5.0 (Windows NT 6.1; WOW64) AppleWebKit/537.36 (KHTML, like Gecko) Chrome/41.0.2272.101 Safari/537.36'),
	('Cookie', 'select_city=320100; lianjia_uuid=c73af582-9ed7-42ed-9738-bbd4688c67e0; UM_distinctid=15bb9f33ca387c-0ac15874ad5d0d-6a11157a-1fa400-15bb9f33ca4a02; _jzqckmp=1; all-lj=c28812af28ef34a41ba2474a2b5c52c2; _jzqx=1.1493473537.1493544561.2.jzqsr=nj%2Elianjia%2Ecom|jzqct=/ershoufang/gulou/.jzqsr=nj%2Elianjia%2Ecom|jzqct=/xiaoqu/pg1/; _gat=1; _gat_past=1; _gat_global=1; _gat_new_global=1; _gat_dianpu_agent=1; _smt_uid=59049861.8870a59; CNZZDATA1253492138=835595246-1493470448-null%7C1493541950; CNZZDATA1254525948=1922726511-1493470772-null%7C1493540995; CNZZDATA1255633284=630946367-1493469955-null%7C1493543402; CNZZDATA1255604082=270979082-1493468920-null%7C1493544528; _qzja=1.1520598967.1493473405458.1493480837509.1493544561423.1493544849473.1493544851953.0.0.0.29.3; _qzjb=1.1493544561423.10.0.0.0; _qzjc=1; _qzjto=10.1.0; _jzqa=1.2414222906473966000.1493473537.1493480838.1493544561.3; _jzqc=1; _jzqb=1.10.10.1493544561.1; _ga=GA1.2.1108117219.1493473408; _gid=GA1.2.2091828031.1493544853; lianjia_ssid=5c8ebd96-81f4-4430-bfda-6d941fcb8663')]

	urllib.request.install_opener(opener)

	html_bytes = urllib.request.urlopen(url).read()
	html_string = html_bytes.decode('utf-8')
	return html_string


def start(start_url):
	html_doc = getVillage(start_url)
	soup = BeautifulSoup(html_doc, 'html.parser')

	#获取所有页数和现在页数
	totalPageNoDiv=soup.find("div","house-lst-page-box")
	Page = eval(totalPageNoDiv.attrs['page-data'])

	totalPageNo = Page['totalPage']
	curPage = Page['curPage']

	print('当前正在抓取第'+str(curPage)+'页,共'+str(totalPageNo)+'页.')


	#获取小区内容
	divs = soup.find_all("div","title")
	for div in divs:
		a_tag = div.find("a",target="_blank")
		if(a_tag):
			#插入数据库
			sql = "INSERT INTO `village` (`name`) VALUES (%s)"
			cur.execute(sql, (a_tag.string))

	curPage = curPage + 1;
	if(totalPageNo == curPage-1):
		print('执行完毕.')
	else:
		time.sleep(10)
		start_url = "http://nj.lianjia.com/xiaoqu/pg"+str(curPage)
		start(start_url)


totalPageNo=1
curPage=1

start_url = "http://nj.lianjia.com/xiaoqu/pg"+str(curPage)
start(start_url)


cur.close()#关闭游标
conn.close()#释放数据库资源
__author__='LeoKim'
from bs4 import BeautifulSoup
import pymysql
import urllib.request, urllib.parse, http.cookiejar
from urllib import parse
import pymysql

conn=pymysql.connect(host='localhost',user='root',passwd='superhero',db='python_test',port=3306,charset='utf8')
cur=conn.cursor()#获取一个游标

def getgeohash(keyword):
	key={
		'keyword':keyword
	}


	url='https://mainsite-restapi.ele.me/v2/pois?extras%5B%5D=count&geohash=wtsm0ss7yfj8&limit=20&type=nearby&'+parse.urlencode(key)

	cj = http.cookiejar.CookieJar()
	opener = urllib.request.build_opener(urllib.request.HTTPCookieProcessor(cj))
	opener.addheaders = [('User-Agent','Mozilla/5.0 (Windows NT 6.1; WOW64) AppleWebKit/537.36 (KHTML, like Gecko) Chrome/41.0.2272.101 Safari/537.36'),
	('Cookie', 'ubt_ssid=but8xnmtkpfrbvypd9z3hxaa5i8ugmj0_2017-04-29; _utrace=edd9bb6de13caed667d2cf273d73fc0a_2017-04-29')]

	urllib.request.install_opener(opener)

	html_bytes = urllib.request.urlopen(url).read()
	html_string = html_bytes.decode('utf-8')
	soup = BeautifulSoup(html_string, 'html.parser')

	try:
		info = eval(soup.prettify())
		if len(info) and info is not None:
			return info[0]
		else:
			return 'error'	
	except:
		return 'error'
	

sql = "SELECT id,name FROM `village` where geohash is null"
cur.execute(sql)
data = cur.fetchall()

for d in data:
	print(d[0])

	geohash=''
	latitude=''
	longitude=''

	gh=getgeohash(d[1])

	if gh=='error':
		geohash='error'
		latitude=''
		longitude=''
	else:
		geohash = gh['geohash']
		latitude = gh['latitude']
		longitude = gh['longitude']

	print(geohash,latitude,longitude)

# gh['geohash'] is None

	sql = "UPDATE `village` SET geohash=%s,latitude=%s,longitude=%s where id=%s"
	cur.execute(sql, (geohash,latitude,longitude,d[0]))
	
cur.close()#关闭游标
conn.close()#释放数据库资源
__author__='LeoKim'
from bs4 import BeautifulSoup
import pymysql
import urllib.request, urllib.parse, http.cookiejar
from urllib import parse
import pymysql
import json
import re

conn=pymysql.connect(host='localhost',user='root',passwd='superhero',db='python_test',port=3306,charset='utf8')
cur=conn.cursor()#获取一个游标

def getstore(village_id,geohash,latitude,longitude,limit):
	key={
		'geohash':geohash,
		'latitude':latitude,
		'longitude':longitude,
		'limit':limit
	}


	url='https://mainsite-restapi.ele.me/shopping/restaurants?extras%5B%5D=activities&offset=0&terminal=web'+parse.urlencode(key)

	cj = http.cookiejar.CookieJar()
	opener = urllib.request.build_opener(urllib.request.HTTPCookieProcessor(cj))
	opener.addheaders = [('User-Agent','Mozilla/5.0 (Windows NT 6.1; WOW64) AppleWebKit/537.36 (KHTML, like Gecko) Chrome/41.0.2272.101 Safari/537.36'),
	('Cookie', 'ubt_ssid=but8xnmtkpfrbvypd9z3hxaa5i8ugmj0_2017-04-29; _utrace=edd9bb6de13caed667d2cf273d73fc0a_2017-04-29')]

	urllib.request.install_opener(opener)

	html_bytes = urllib.request.urlopen(url).read()
	html_string = html_bytes.decode('utf-8')
	soup = BeautifulSoup(html_string, 'html.parser')

	info = soup.prettify()
	jsonData = json.loads(info)
	

	for data in jsonData:

		print(data['id'])
		print(village_id)
		print(data['name'])
		print(data['recent_order_num'])
		print(data['address'])
		print(data['order_lead_time'])
		print(data['float_delivery_fee'])

		average_cost=0
		if 'average_cost' in data:
			cost = re.findall(r'\d+', data['average_cost'])
			average_cost=cost[0]
			print(average_cost)

		print(data['rating'])
		print('---------------------------------------------')

		shop_id = data['id']
		name = data['name']
		address = data['address']
		recent_order_num = data['recent_order_num']
		order_lead_time = data['order_lead_time']
		float_delivery_fee = data['float_delivery_fee']
		rating = data['rating']

		sql = "INSERT INTO `store` (`shop_id`,`village_id`,`name`,`address`,`recent_order_num`,`order_lead_time`,`float_delivery_fee`, `average_cost`, `rating`) VALUES (%s,%s,%s,%s,%s,%s,%s,%s,%s)"
		cur.execute(sql, (shop_id,village_id,name, address, recent_order_num, order_lead_time, float_delivery_fee, average_cost, rating))


# getstore('wtst84g4g0u','31.91988','118.83238',30)

sql = "SELECT id,name,geohash,latitude,longitude FROM `village` where id >482 and geohash is not null"
cur.execute(sql)
data = cur.fetchall()

for d in data:
	village_id=d[0]
	geohash = d[2]
	latitude = d[3]
	longitude = d[4]

	getstore(village_id,geohash,latitude,longitude,30)


cur.close()#关闭游标
conn.close()#释放数据库资源