nohup python2 DDNS.py &
标签: python
python3 模拟登陆
import urllib.request, urllib.parse, urllib.error
import http.cookiejar

login_url = 'http://blog.leokim.cn/wp-login.php'
values = {'log':'xxxxxxx','pwd':'xxxxxxxxxxxxx'}
postdata = urllib.parse.urlencode(values).encode()
user_agent = r'Mozilla/5.0 (Windows NT 6.1; WOW64) AppleWebKit/537.36 (KHTML, like Gecko) Chrome/44.0.2403.157 Safari/537.36'
headers = {'User-Agent': user_agent, 'Connection': 'keep-alive'}

cookie_filename = 'cookie.txt'
cookie = http.cookiejar.MozillaCookieJar(cookie_filename)
handler = urllib.request.HTTPCookieProcessor(cookie)
opener = urllib.request.build_opener(handler)

request = urllib.request.Request(login_url, postdata, headers)
try:
    response = opener.open(request)
    page = response.read().decode()
    # print(page)
except urllib.error.URLError as e:
    print(e.code, ':', e.reason)

cookie.save(ignore_discard=True, ignore_expires=True)  # 保存cookie到cookie.txt中
print(cookie)

for item in cookie:
    print('Name = ' + item.name)
    print('Value = ' + item.value)


get_url = 'http://blog.leokim.cn/wp-admin/edit.php'  # 利用cookie请求访问另一个网址
get_request = urllib.request.Request(get_url, headers=headers)
get_response = opener.open(get_request)
print(get_response.read().decode())
用cookie直接访问
import urllib.request, urllib.parse, urllib.error
import http.cookiejar

cookie_filename = 'cookie.txt'
cookie = http.cookiejar.MozillaCookieJar(cookie_filename)
cookie.load(cookie_filename, ignore_discard=True, ignore_expires=True)

handler = urllib.request.HTTPCookieProcessor(cookie)
opener = urllib.request.build_opener(handler)

get_url = 'http://blog.leokim.cn/wp-admin/tools.php'
get_request = urllib.request.Request(get_url)
get_response = opener.open(get_request)
print(get_response.read().decode())
Python3 urllib使用方法
我自己码了一遍结果没注意浏览器返回上一页了 艹
直接复制粘贴了吧 再搞一遍太麻烦了
1、最简单
import urllib.request
response = urllib.request.urlopen('http://python.org/')
html = response.read()
2、使用 Request
import urllib.request
req = urllib.request.Request('http://python.org/')
response = urllib.request.urlopen(req)
the_page = response.read()
3、发送数据
#! /usr/bin/env python3
import urllib.parse
import urllib.request
url = 'http://localhost/login.php'
user_agent = 'Mozilla/4.0 (compatible; MSIE 5.5; Windows NT)'
values = {
'act' : 'login',
'login[email]' : 'yzhang@i9i8.com',
'login[password]' : '123456'
}
data = urllib.parse.urlencode(values)
req = urllib.request.Request(url, data)
req.add_header('Referer', 'http://www.python.org/')
response = urllib.request.urlopen(req)
the_page = response.read()
print(the_page.decode("utf8"))
4、发送数据和header
#! /usr/bin/env python3
import urllib.parse
import urllib.request
url = 'http://localhost/login.php'
user_agent = 'Mozilla/4.0 (compatible; MSIE 5.5; Windows NT)'
values = {
'act' : 'login',
'login[email]' : 'yzhang@i9i8.com',
'login[password]' : '123456'
}
headers = { 'User-Agent' : user_agent }
data = urllib.parse.urlencode(values)
req = urllib.request.Request(url, data, headers)
response = urllib.request.urlopen(req)
the_page = response.read()
print(the_page.decode("utf8"))
5、http 错误
#! /usr/bin/env python3
import urllib.request
req = urllib.request.Request('http://www.111cn.net ')
try:
urllib.request.urlopen(req)
except urllib.error.HTTPError as e:
print(e.code)
print(e.read().decode("utf8"))
6、异常处理1
#! /usr/bin/env python3
from urllib.request import Request, urlopen
from urllib.error import URLError, HTTPError
req = Request("http://www.111cn.net /")
try:
response = urlopen(req)
except HTTPError as e:
print('The server couldn't fulfill the request.')
print('Error code: ', e.code)
except URLError as e:
print('We failed to reach a server.')
print('Reason: ', e.reason)
else:
print("good!")
print(response.read().decode("utf8"))
7、异常处理2
#! /usr/bin/env python3
from urllib.request import Request, urlopen
from urllib.error import  URLError
req = Request("http://www.111cn.net /")
try:
response = urlopen(req)
except URLError as e:
if hasattr(e, 'reason'):
print('We failed to reach a server.')
print('Reason: ', e.reason)
elif hasattr(e, 'code'):
print('The server couldn't fulfill the request.')
print('Error code: ', e.code)
else:
print("good!")
print(response.read().decode("utf8"))
8、HTTP 认证
#! /usr/bin/env python3
import urllib.request
# create a password manager
password_mgr = urllib.request.HTTPPasswordMgrWithDefaultRealm()
# Add the username and password.
# If we knew the realm, we could use it instead of None.
top_level_url = "https://www.111cn.net /"
password_mgr.add_password(None, top_level_url, 'rekfan', 'xxxxxx')
handler = urllib.request.HTTPBasicAuthHandler(password_mgr)
# create "opener" (OpenerDirector instance)
opener = urllib.request.build_opener(handler)
# use the opener to fetch a URL
a_url = "https://www.111cn.net /"
x = opener.open(a_url)
print(x.read())
# Install the opener.
# Now all calls to urllib.request.urlopen use our opener.
urllib.request.install_opener(opener)
a = urllib.request.urlopen(a_url).read().decode('utf8')
print(a)
9、使用代理
#! /usr/bin/env python3
import urllib.request
proxy_support = urllib.request.ProxyHandler({'sock5': 'localhost:1080'})
opener = urllib.request.build_opener(proxy_support)
urllib.request.install_opener(opener)
a = urllib.request.urlopen("http://www.111cn.net ").read().decode("utf8")
print(a)
10、超时
#! /usr/bin/env python3
import socket
import urllib.request
# timeout in seconds
timeout = 2
socket.setdefaulttimeout(timeout)
# this call to urllib.request.urlopen now uses the default timeout
# we have set in the socket module
req = urllib.request.Request('http://www.111cn.net /')
a = urllib.request.urlopen(req).read()
print(a)
python 下载远程视频到本地
#!/usr/bin/env python
#-*-coding:utf-8-*-'
#Filename:download_file.py

import sys,os
import urllib.request

def urlcallback(a,b,c):
    """
        call back function
        a,已下载的数据块
        b,数据块的大小
        c,远程文件的大小
    """
    prec=100.0*a*b/c
    if 100 < prec:
        prec=100
    print("%.2f%%"%(prec,))

def main(argv):
    """
        main
    """
    print("start...")
    urllib.request.urlretrieve("https://bd.phncdn.com/videos/201210/15/6345721/vl_720_831k_6345721.mp4?ipa=47.52.4.119&rs=146&ri=1200&s=1495199710&e=1495206910&h=6a18d80e510cc3deb9f455d39c82931c"\
                      ,"1.mp4"\
                      ,urlcallback)
    print("end...")

if __name__=="__main__":
    main(sys.argv[1:])
猴子补丁(monkey patch)
monkey patch指的是在运行时动态替换,一般是在startup的时候.
用过gevent就会知道,会在最开头的地方gevent.monkey.patch_all();把标准库中的thread/socket等给替换掉.这样我们在后面使用socket的时候可以跟平常一样使用,无需修改任何代码,但是它变成非阻塞的了.
之前做的一个游戏服务器,很多地方用的import json,后来发现ujson比自带json快了N倍,于是问题来了,难道几十个文件要一个个把import json改成import ujson as json吗?
其实只需要在进程startup的地方monkey patch就行了.是影响整个进程空间的.
同一进程空间中一个module只会被运行一次.
下面是代码.
main.py
import jsonimport ujsondef monkey_patch_json():
	json.__name__ = 'ujson'
	json.dumps = ujson.dumps
	json.loads = ujson.loads

monkey_patch_json()
print 'main.py',json.__name__
import sub
sub.py
import jsonprint 'sub.py',json.__name__
运行main.py,可以看到都是输出'ujson',说明后面import的json是被patch了的.
最后,注意不能单纯的json = ujson来替换.
python 协程
#生产者
def consumer():
    r = ''
    while True:
        n = yield r
        if not n:
            return
        print('[CONSUMER] Consuming %s...' % n)
        r = '200 OK'


def produce(c):
	#启动生成器
    c.send(None)
    n = 0
    while n < 5:
        n = n + 1
        print('[PRODUCER] Producing %s...' % n)

        #切换到consumer执行
        r = c.send(n)

        print('[PRODUCER] Consumer return: %s' % r)
    c.close()

c = consumer()
produce(c)
注意到consumer函数是一个generator,把一个consumer传入produce后:
1. 首先调用c.send(None)启动生成器;
2. 然后,一旦生产了东西,通过c.send(n)切换到consumer执行;
3. consumer通过yield拿到消息,处理,又通过yield把结果传回;
4. produce拿到consumer处理的结果,继续生产下一条消息;
5. produce决定不生产了,通过c.close()关闭consumer,整个过程结束。
整个流程无锁,由一个线程执行,produce和consumer协作完成任务,所以称为“协程”,而非线程的抢占式多任务。
python 多线程
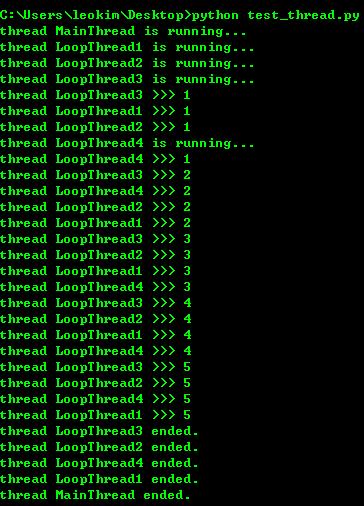
import time, threading

#新线程执行的代码:
def loop():
	print('thread %s is running...' % threading.current_thread().name)
	n = 0
	while n < 5:
		n = n + 1
		print('thread %s >>> %s' % (threading.current_thread().name, n))
		time.sleep(1)
	print('thread %s ended.' % threading.current_thread().name)

print('thread %s is running...' % threading.current_thread().name)
t1 = threading.Thread(target=loop, name='LoopThread1')
t1.start()
t2 = threading.Thread(target=loop, name='LoopThread2')
t2.start()
t3 = threading.Thread(target=loop, name='LoopThread3')
t3.start()
t4 = threading.Thread(target=loop, name='LoopThread4')
t4.start()

t1.join()
t2.join()
t3.join()
t4.join()
print('thread %s ended.' % threading.current_thread().name)

由于任何进程默认就会启动一个线程,我们把该线程称为主线程,主线程又可以启动新的线程,Python的threading模块有个current_thread()函数,它永远返回当前线程的实例。主线程实例的名字叫MainThread,子线程的名字在创建时指定,我们用LoopThread命名子线程。名字仅仅在打印时用来显示,完全没有其他意义,如果不起名字Python就自动给线程命名为Thread-1,Thread-2……
Lock
多线程和多进程最大的不同在于,多进程中,同一个变量,各自有一份拷贝存在于每个进程中,互不影响,而多线程中,所有变量都由所有线程共享,所以,任何一个变量都可以被任何一个线程修改,因此,线程之间共享数据最大的危险在于多个线程同时改一个变量,把内容给改乱了。来看看多个线程同时操作一个变量怎么把内容给改乱了:
import time, threading

#假定这是你的银行存款:
balance = 0

def change_it(n):
	#先存后取,结果应该为0:
	global balance
	balance = balance + n
	balance = balance - n

def run_thread(n):
	for i in range(100000):
		change_it(n)

t1 = threading.Thread(target=run_thread, args=(5,))
t2 = threading.Thread(target=run_thread, args=(8,))
t1.start()
t2.start()
t1.join()
t2.join()
print(balance)
结果跑出来会不一样,可以给线程加lock解决问题 因为这个现在还不怎么用到 所以就不深究了 可以在这里查看
http://www.liaoxuefeng.com/wiki/0014316089557264a6b348958f449949df42a6d3a2e542c000/00143192823818768cd506abbc94eb5916192364506fa5d000
python多进程
创建子进程
from  multiprocessing import Process
import os

#子进程要执行的代码
def run_proc(name):
    print('Run child process %s (%s)...' % (name, os.getpid()))

if __name__=='__main__':
 	print('Parent process %s.' % os.getpid())
 	p = Process(target=run_proc, args=('test',))
 	print('Child process will start.')
 	p.start()
 	p.join()
 	print('Child process end.')

用Process来创建子进程
Process([group [, target [, name [, args [, kwargs]]]]])
target表示调用对象,args表示调用对象的位置参数元组。kwargs表示调用对象的字典。Name为别名。Group实质上不使用。
进程池
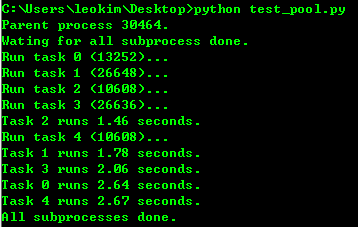
from multiprocessing import Pool
import os, time, random

def log_time_task(name):
	print('Run task %s (%s)...' % (name, os.getpid()))
	start = time.time()
	time.sleep(random.random()*3)
	end = time.time()
	print('Task %s runs %0.2f seconds.' % (name, (end-start)))

if __name__=='__main__':
	print('Parent process %s.' % os.getpid())
	#pool默认大小是cpu核数
	p = Pool(4)
	for i in range(5):
		#pool.apply_async()用来向进程池提交目标请求
		p.apply_async(log_time_task, args=(i,))
	print('Wating for all subprocess done.')
	p.close()
	#pool.join()是用来等待进程池中的worker进程执行完毕,防止主进程在worker进程结束前结束.
	#但pool.join()必须使用在pool.close()或者pool.terminate()之后.
	#其中close()跟terminate()的区别在于close()会等待池中的worker进程执行结束再关闭pool,而terminate()则是直接关闭.
	p.join()
	print('All subprocesses done.')

	#result.successful()表示整个调用执行的状态,如果还有worker没有执行完,则会抛出AssertionError异常。
	#利用multiprocessing下的Pool可以很方便的同时自动处理几百或者上千个并行操作,脚本的复杂性也大大降低。

pool默认大小是cpu核数
pool.join()是用来等待进程池中的worker进程执行完毕,防止主进程在worker进程结束前结束.
但pool.join()必须使用在pool.close()或者pool.terminate()之后.
其中close()跟terminate()的区别在于close()会等待池中的worker进程执行结束再关闭pool,而terminate()则是直接关闭.
result.successful()表示整个调用执行的状态,如果还有worker没有执行完,则会抛出AssertionError异常。
利用multiprocessing下的Pool可以很方便的同时自动处理几百或者上千个并行操作,脚本的复杂性也大大降低。
子进程
很多时候子进程并不是自身,而是一个外部进程。我们创建了子进程后,还需要进程的输入和输出。
subprocess模块可以让我们非常方便的启动一个子进程,然后控制其输入输出。
进程间通信
http://www.liaoxuefeng.com/wiki/0014316089557264a6b348958f449949df42a6d3a2e542c000/001431927781401bb47ccf187b24c3b955157bb12c5882d000
python字符串前面加u,r,b的含义
u/U:表示unicode字符串
不是仅仅是针对中文, 可以针对任何的字符串,代表是对字符串进行unicode编码。
一般英文字符在使用各种编码下, 基本都可以正常解析, 所以一般不带u;但是中文, 必须表明所需编码, 否则一旦编码转换就会出现乱码。
建议所有编码方式采用utf8
r/R:非转义的原始字符串
与普通字符相比,其他相对特殊的字符,其中可能包含转义字符,即那些,反斜杠加上对应字母,表示对应的特殊含义的,比如最常见的”\n”表示换行,”\t”表示Tab等。而如果是以r开头,那么说明后面的字符,都是普通的字符了,即如果是“\n”那么表示一个反斜杠字符,一个字母n,而不是表示换行了。
以r开头的字符,常用于正则表达式,对应着re模块。
b:bytes
python3.x里默认的str是(py2.x里的)unicode, bytes是(py2.x)的str, b”“前缀代表的就是bytes
python2.x里, b前缀没什么具体意义, 只是为了兼容python3.x的这种写法
Python3 第三方库记录
记录一些不熟的 python3 的第三方库
不定时更新
Requests
Requests 是用Python语言编写,基于 urllib,采用 Apache2 Licensed 开源协议的 HTTP 库。它比 urllib 更加方便,可以节约我们大量的工作,完全满足 HTTP 测试需求。Requests 的哲学是以 PEP 20 的习语为中心开发的,所以它比 urllib 更加 Pythoner。更重要的一点是它支持 Python3 哦
使用方法:http://blog.csdn.net/shanzhizi/article/details/50903748
======================================================================================
monkey patch
http://blog.leokim.cn/2017/05/15/%E7%8C%B4%E5%AD%90%E8%A1%A5%E4%B8%81monkey-patch/
http://www.liaoxuefeng.com/wiki/001374738125095c955c1e6d8bb493182103fac9270762a000/001407503089986d175822da68d4d6685fbe849a0e0ca35000
======================================================================================
gevent
gevent是基于协程的Python网络库
包含的特性:
1.基于libev的快速事件循环
2.基于greenlet的轻量级执行单元
3.重用Python标准库且概念相似的API
4.支持SSL的协作socket
5.通过c-ares或者线程池进行DNS查询
6.使用标准库和第三方库中使用了阻塞socket的代码的能力
支持Python版本:
>=2.6 和>=3.3
gevent是Python世界中最重要的异步网络库,可以大幅度提高系统的性能。最可贵的是,它允许我们几乎不修改代码,把同步程序变为异步程序。使用的技术就是我们之前讲过的monkey patch。
======================================================================================
asyncio
asyncio是在python3.4中被引进的异步IO库。
你也可以通过python3.3的pypi来安装它。
它相当的复杂,而且我不会介绍太多的细节。
相反,我将会解释你需要知道些什么,以利用它来写异步的代码。
简而言之,有两件事情你需要知道:协同程序和事件循环。
协同程序像是方法,但是它们可以在代码中的特定点暂停和继续。
当在等待一个IO(比如一个HTTP请求),同时执行另一个请求的时候,可以用来暂停一个协同程序。
我们使用关键字yield from来设定一个状态,表明我们需要一个协同程序的返回值。
而事件循环则被用来安排协同程序的执行。
======================================================================================
Logging
This module defines functions and classes which implement a flexible event logging system for applications and libraries.
The key benefit of having the logging API provided by a standard library module is that all Python modules can participate in logging, so your application log can include your own messages integrated with messages from third-party modules.
======================================================================================
ghost
这个库以前用过,能等页面所有的ajax返回完毕之后在爬取页面