SELECT COALESCE(SUM(f.voucher_value), 0) as amount
月度归档: 2019年11月
将python脚本添加为centos7服务
树莓派上做的ddns要自启动
sudo vim /usr/lib/systemd/system/myddns.service
#这里myservice.service可以定义为自己想要取的名字。
[Unit]
Description=myddns Service
After=multi-user.target
[Service]
Type=idle
ExecStart=/usr/bin/python2.7   /root/hwx_aliyun_ddns/DDNS.py
[Install]
WantedBy=multi-user.target
更改文件权限
sudo chmod 644 /usr/lib/systemd/system/myddns.service
使配置文件生效
sudo systemctl daemon-reload     #重载服务列表
sudo systemctl enable myddns.service  #设置开机自启动
sudo systemctl start  myddns.service    #开启服务
sudo systemctl  status  myddns.service   #查看服务是否正常运行

或者重启查看能否自启动。
reboot

centos7 设置固定ip
目前的eth0地址:
eth0: flags=4163<UP,BROADCAST,RUNNING,MULTICAST>  mtu 1500
        inet 192.168.101.104  netmask 255.255.255.0  broadcast 192.168.101.255
        inet6 fe80::5099:46ff:fe57:603e  prefixlen 64  scopeid 0x20<link>
        ether 52:99:46:57:60:3e  txqueuelen 1000  (Ethernet)
        RX packets 267860  bytes 295712013 (282.0 MiB)
        RX errors 0  dropped 0  overruns 0  frame 0
        TX packets 233105  bytes 26260005 (25.0 MiB)
        TX errors 0  dropped 0 overruns 0  carrier 0  collisions 0
编辑eth0的文件
vi /etc/sysconfig/network-scripts/ifcfg-eth0
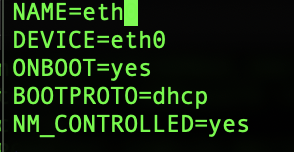
修改前

修改后
NAME=eth0
DEVICE=eth0
ONBOOT=yes
BOOTPROTO=static
NM_CONTROLLED=yes
IPADDR=192.168.101.104
NETMASK=255.255.255.0
GATEWAY=192.168.101.255
树莓派centos7安装shadowsocket
安装ss
pip install shadowsocks
创建配置文件 /etc/shadowsocks.json
{
        "server": "0.0.0.0",
        "server_port": 12000,
        "local_address": "127.0.0.1",
        "local_port": 12000,
        "password": "yourpassword",
        "timeout": 300,
        "method": "aes-256-cfb",
        "fast_open": true,
        "workers": 1
}
配置自启动
[Unit]

Description=Shadowsocks


[Service]

TimeoutStartSec=0

ExecStart=/usr/bin/ssserver -c /etc/shadowsocks.json
执行以下命令启动 shadowsocks 服务:
systemctl enable shadowsocks

systemctl start shadowsocks

systemctl status shadowsocks -l
最后要检查一下端口(12000)是否开放 要不然没办法使用代理
[Standard_init_linux.go:190: exec user process caused “exec format error]
You have to run the docker image that was built for a particular Architecture on a docker node that is running that same Architecture.
Take docker out of the picture for a moment. You can’t run a Linux application compiled and built on a Linux ARM machine and run it on a Linux amd64 machine. You can’t run a Linux application compiled and built on a Linux Power machine on a Linux amd64 machine.
I answered this same issue/question in this another post.
Take a look -> How much does Docker virtualize? 367
change some type campaign
(LL1000017085PJ - LL10000017094PJ and LL5000000881PJ-LL5000000PJ884)


#70841,70842,70843,70844,70845,70846,70847,70848,70849,70850
select group_concat(voucher_id) from voucher where prefix='LL10' and voucher_no between 17085 and 17094 and suffix = 'PJ'

#669749,669750,669751,669752
select group_concat(voucher_id) from voucher where prefix='LL50' and voucher_no between 881 and 884 and suffix = 'PJ'

select * from voucher_campaign_issue where voucher_id = 669749


#23 -> 25
select * from voucher_campaign where campaign_id in (23,25)

select * from voucher_campaign_issue where voucher_id in (70841,70842,70843,70844,70845,70846,70847,70848,70849,70850,669749,669750,669751,669752)

select * from voucher_campaign_issue_request where request_id = 106050

select * from voucher_request_approve where request_id = 106050

select * from voucher_action where voucher_id in (70841,70842,70843,70844,70845,70846,70847,70848,70849,70850,669749,669750,669751,669752) and action_id = 30


update voucher_campaign_issue set campaign_id = 25 where voucher_id in (70841,70842,70843,70844,70845,70846,70847,70848,70849,70850,669749,669750,669751,669752);

update voucher_campaign_issue_request set campaign_id = 25 where request_id = 106050

update voucher_request_approve set request_remarks = 'Citibank Internet Rewards $50
Type: Partner Redemption
Expiry Date: 2020-11-22
Receipt Number: BR0009005
Ref No.: 00002036968916001,00002036968916002,00002036968916003,00002036968916006,00002036968916005,00002036968916004
Name: Jason  Chua'
where request_id = 106050

update voucher_action
set remarks = 'Citibank Internet Rewards $50
Type: Partner Redemption
Expiry Date: 2020-11-22
Receipt Number: BR0009005
Ref No.: 00002036968916001,00002036968916002,00002036968916003,00002036968916006,00002036968916005,00002036968916004
Name: Jason  Chua'
where voucher_id in (70841,70842,70843,70844,70845,70846,70847,70848,70849,70850,669749,669750,669751,669752) and action_id = 30;
docker ss 容器
docker run -d -p 54285:54285 oddrationale/docker-shadowsocks -s 0.0.0.0 -p 54285 -k yourpasswd -m aes-256-cfb
python后台挂起 退出不关
nohup python2 DDNS.py &
Spring 学习
一.使用正常方式
study_spring/src/applicationContext.xml
<bean name="c" class="com.how2java.pojo.Category">
    <property name="name" value="category 1" />
</bean>

<bean name="p" class="com.how2java.pojo.Product">
    <property name="name" value="Product 1" />
    <property name="category" ref="c" />
</bean>
/study_spring/src/cn/leokim/pojo/Product.java
package cn.leokim.pojo;

public class Product {
    private int id;
    private String name;
    private Category category;

    public int getId() {
        return id;
    }
    public void setId(int id) {
        this.id = id;
    }
    public String getName() {
        return name;
    }
    public void setName(String name) {
        this.name = name;
    }

    public Category getCategory(){
        return category;
    }

    public void setCategory(Category category){
        this.category = category;
    }
}
study_spring/src/cn/leokom/test/TestSpring.java
package cn.leokim.pojo;

import org.springframework.context.ApplicationContext;
import org.springframework.context.support.ClassPathXmlApplicationContext;

import com.how2java.pojo.Category;
import com.how2java.pojo.Product;

public class TestSpring {
    public static void main(String[] args) {
        ApplicationContext context = new ClassPathXmlApplicationContext(
                new String[] { "applicationContext.xml" });

//        Category c = (Category) context.getBean("c");
        Product p = (Product) context.getBean("p");

//        System.out.println(c.getName());
        System.out.println(p.getCategory().getName());
    }
}
二.注解方式
study_spring/src/applicationContext.xml
<?xml version="1.0" encoding="UTF-8"?>
<beans xmlns="http://www.springframework.org/schema/beans"
       xmlns:xsi="http://www.w3.org/2001/XMLSchema-instance"
       xmlns:aop="http://www.springframework.org/schema/aop"
       xmlns:tx="http://www.springframework.org/schema/tx"
       xmlns:context="http://www.springframework.org/schema/context"
       xsi:schemaLocation="
   http://www.springframework.org/schema/beans
   http://www.springframework.org/schema/beans/spring-beans-3.0.xsd
   http://www.springframework.org/schema/aop
   http://www.springframework.org/schema/aop/spring-aop-3.0.xsd
   http://www.springframework.org/schema/tx
   http://www.springframework.org/schema/tx/spring-tx-3.0.xsd
   http://www.springframework.org/schema/context
   http://www.springframework.org/schema/context/spring-context-3.0.xsd">

    <context:annotation-config/>
    <bean name="c" class="com.how2java.pojo.Category">
        <property name="name" value="category 1" />
    </bean>

    <bean name="p" class="com.how2java.pojo.Product">
        <property name="name" value="Product 1" />
<!--        <property name="category" ref="c" />-->
    </bean>

</beans>
public class Product {
    private int id;
    private String name;

//    @Autowired
    @Resource(name="c")
    private Category category;

    public int getId() {
        return id;
    }
    public void setId(int id) {
        this.id = id;
    }
    public String getName() {
        return name;
    }
    public void setName(String name) {
        this.name = name;
    }

    public Category getCategory(){
        return category;
    }

    public void setCategory(Category category){
        this.category = category;
    }
}
注解方式还可以更简单
1.applicationContext.xml去掉之前的配置,只用一行
<context:component-scan base-package="cn.leokim.pojo"/>
2.在Category上添加注解
@Component("c")
public class Category {
3.在product上添加注解
@Component("p")
public class Product {
运行出来结果是一样的
php计算毫秒差
$start_time = microtime(true);
$end_time = microtime(true);

number_format($time_difference,3)