3471224395
MItong!@#¥¥#@!
去芜存菁
3471224395
MItong!@#¥¥#@!

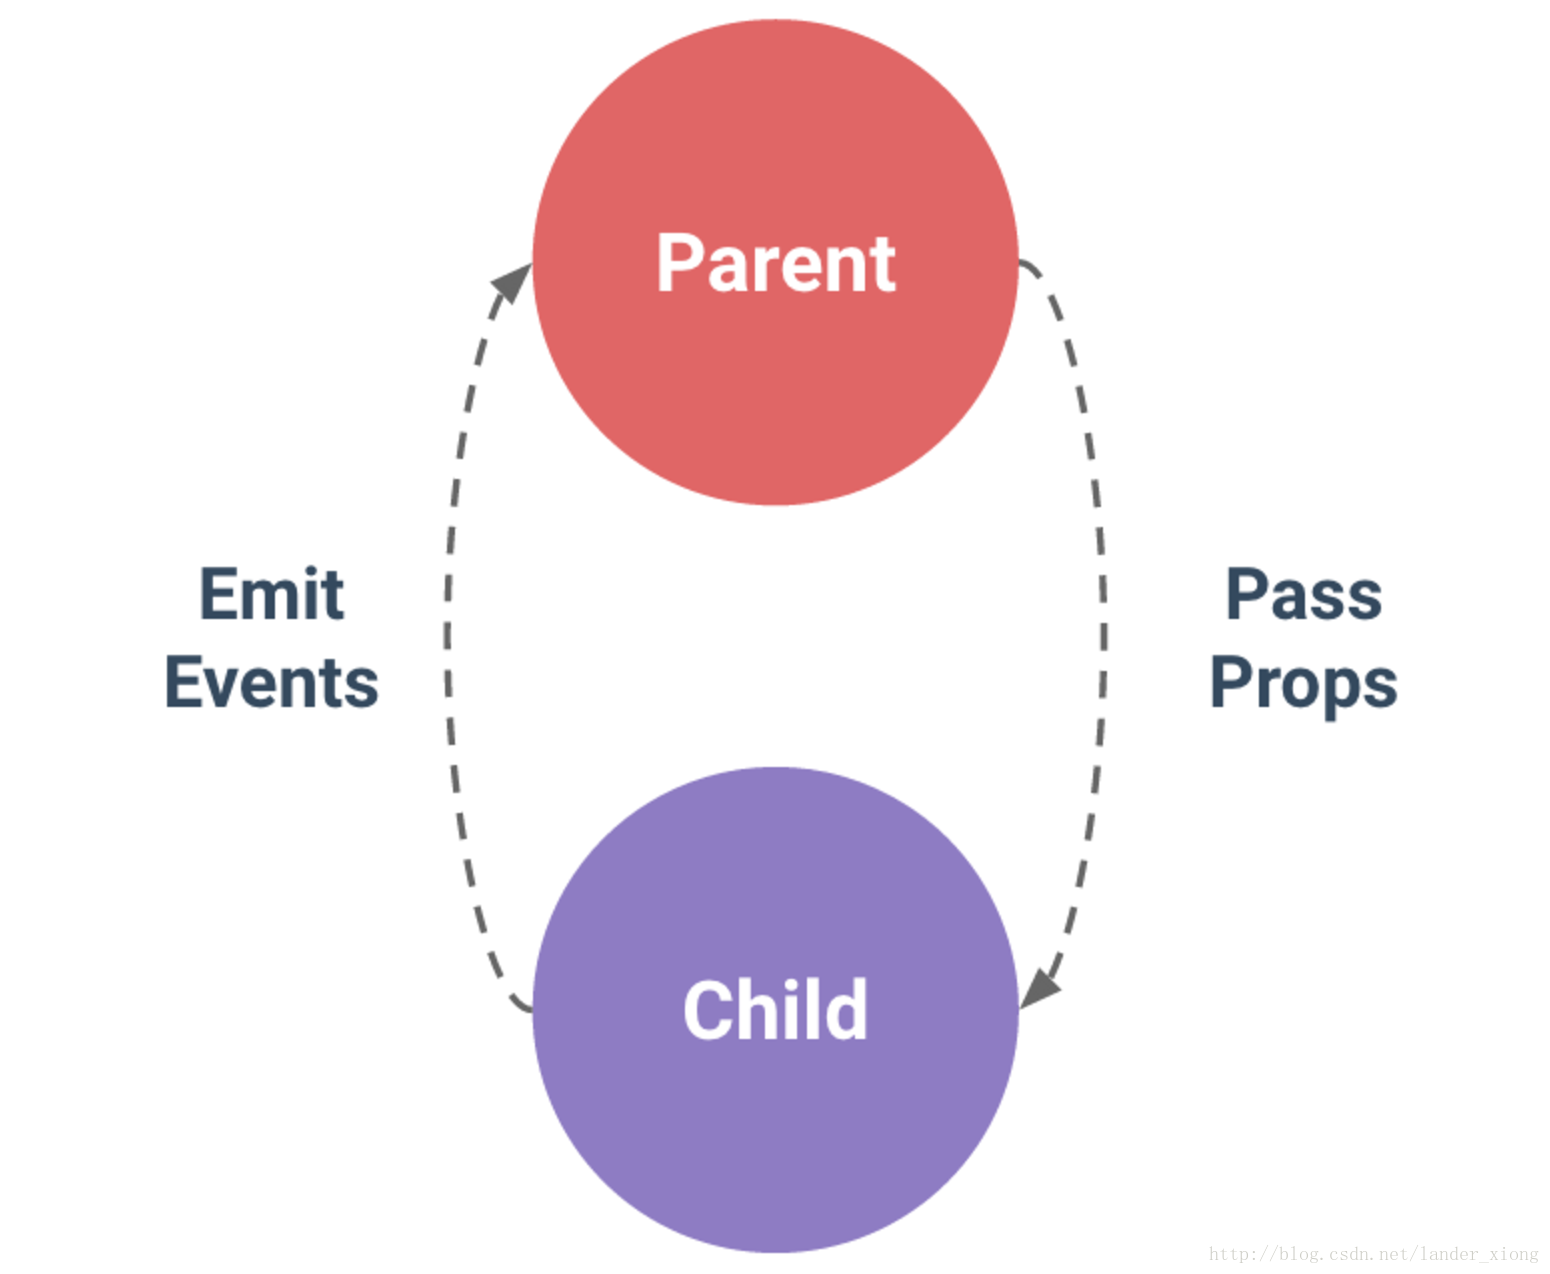
父组件向子组件传值
父组件
<template>
  <div>
    父组件:    <input type="text" v-model="name">
    <br>
    <br>
    <!-- 引入子组件 -->
    <child :inputName="name"></child>
  </div></template><script>
  import child from './child'
  export default {
    components: {
      child
    },
    data () {      return {
        name: ''
      }
    }
  }</script>
子组件
<template>
  <div>
    子组件:    <span>{{inputName}}</span>
  </div></template><script>
  export default {    // 接受父组件的值
    props: {
      inputName: String,
      required: true
    }
  }</script>
子组件向父组件传值
子组件
<template>
  <div>
    子组件:    <span>{{childValue}}</span>
    <!-- 定义一个子组件传值的方法 -->
    <input type="button" value="点击触发" @click="childClick">
  </div></template><script>
  export default {
    data () {      return {
        childValue: '我是子组件的数据'
      }
    },
    methods: {
      childClick () {        // childByValue是在父组件on监听的方法
        // 第二个参数this.childValue是需要传的值
        this.$emit('childByValue', this.childValue)
      }
    }
  }</script>
父组件
<template>
  <div>
    父组件:    <span>{{name}}</span>
    <br>
    <br>
    <!-- 引入子组件 定义一个on的方法监听子组件的状态-->
    <child v-on:childByValue="childByValue"></child>
  </div></template><script>
  import child from './child'
  export default {
    components: {
      child
    },
    data () {      return {
        name: ''
      }
    },
    methods: {
      childByValue: function (childValue) {
        // childValue就是子组件传过来的值
        this.name = childValue
      }
    }
  }</script>
非父子组件进行传值
公共bus.js
//bus.jsimport
Vue from 'vue'
export default new Vue()
组件A
<template>
  <div>
    A组件:    <span>{{elementValue}}</span>
    <input type="button" value="点击触发" @click="elementByValue">
  </div></template><script>
  // 引入公共的bug,来做为中间传达的工具
  import Bus from './bus.js'
  export default {
    data () {      return {
        elementValue: 4
      }
    },
    methods: {
      elementByValue: function () {
        Bus.$emit('val', this.elementValue)
      }
    }
  }</script>
组件B
<template>
  <div>
    B组件:    <input type="button" value="点击触发" @click="getData">
    <span>{{name}}</span>
  </div></template><script>
  import Bus from './bus.js'
  export default {
    data () {      return {
        name: 0
      }
    },
    mounted: function () {
      var vm = this
      // 用$on事件来接收参数
      Bus.$on('val', (data) => {
        console.log(data)
        vm.name = data
      })
    },
    methods: {
      getData: function () {
        this.name++
      }
    }
  }</script>
一. 项目结构目录调整
初始文件添加
.editorconfig

再使用EditorConfig for VS Code插件

添加目录
/api
/directive 自定义指令
/lib
/router
/store

/moke (npm isntall mockjs -D)
vue.config.js

基本配置修改
每个人都以为自己是英雄俄底修斯 但是却难有“绳索”自制
<div id="counter-event-example">
  <p>{{ total }}</p>
  <button-counter v-on:increment="incrementTotal"></button-counter>
  <button-counter v-on:increment="incrementTotal"></button-counter>
</div>

<script type="text/javascript" src="./vue.js"></script>

<script>
    Vue.component('button-counter', {
        template: '<button v-on:click="incrementCounter">{{ counter }}</button>',
        data: function () {
            return {
              counter: 0
            }
        },
        methods:{
            incrementCounter:function(){
                this.counter+=1
                this.$emit('increment')
            }
        }
    })

    new Vue({
        el: "#counter-event-example",
        data:{
            total:0
        },
        methods:{
            incrementTotal:function(){
                this.total+=1
            }
        }
    })
</script>


基本的urlopen()函数不支持验证、cookie或其他HTTP高级功能。
要支持这些功能,必须使用build_opener()函数来创建自己的自定义Opener对象。
install_opener(opener) 安装opener作为urlopen()使用的全局URL opener,即意味着以后调用urlopen()时都会使用安装的opener对象。opener通常是build_opener()创建的opener对象。
一些复杂情况详细解决办法:
1. cookie处理
如果要管理HTTP cookie,需要创建添加了HTTPCookieProcessor处理程序的opener对象。默认情况下。HTTPCookieProcessor使用CookieJar对象,将不同类型的CookieJar对象作为HTTPCookieProcessor的参数提供,可支持不同的cookie处理。如下面代码:
url = 'http://www.baidu.com'
postdata = ''
cookie_filename = 'cookie.txt'
cookie =http.cookiejar.MozillaCookieJar(cookie_filename)
handler = urllib.request.HTTPCookieProcessor(cookie)
opener = urllib.request.build_opener(handler)
request = urllib.request.Request(url, postdata, headers)
2.proxy代理
import urllib.request
proxy_handler = urllib.request.ProxyHandler({'http':'123.123.2123.123:8080'})
proxy_auth_handler = urllib.request.ProxyBasicAuthHandler()
proxy_auth_handler.add_password('realm', '123.123.2123.123', 'user', 'password')
opener = urllib.request.build_opener(urllib.request.HTTPHandler, proxy_handler)
f = opener.open('http://www.baidu.com')
a = f.read()
swoole项目已收录到PHP官方扩展库,除了手工下载编译外,还可以通过PHP官方提供的pecl命令,一键下载安装swoole很方便
pecl install swoole

然后添加swoole.so到php.ini


允许从左边或者右边推入或者弹出


list数据可以重复
lpop就是从左边pop
rpop就是从右边pop
push同理

无序存储不同元素


sort set的value必须是全局唯一
如果2条记录的score是一样的 那么就按value的字典顺序排列先后


<?php
$redis = new \Redis();

$redis->connect("127.0.0.1",8089);

//string
$redis->delete("string1");

$redis->set("string1","var1");
$val = $redis->get("string1");
var_dump($val);

$redis->set("string1", 4);
$redis->incr("string1", 2);
$val = $redis->get("string1");
var_dump($val);

?>

常用于队列(订单操作等高并发处理)
<?php
$redis = new \Redis();

$redis->connect("127.0.0.1",8089);


$redis->delete("list1");
$redis->lPush("list1","A");
$redis->lPush("list1","B");
$redis->lPush("list1","C");

$val = $redis->rPop("list1");

var_dump($val);
?>
~


<?php
$redis = new \Redis();

$redis->connect("127.0.0.1",8089);

$redis->delete('driver1');
$redis->hSet("driver1","name","leokim");
$redis->hSet("driver1","age","100");
$redis->hSet("driver1","gender","1");

$val = $redis->hMGet("driver1",array("name","age"));
var_dump($val);
?>

结算分数排行