python aliyun myddns

#!/usr/bin/env python
#coding=utf-8

"""
新增域名解析记录,参数说明如下:
<accessKeyId>:填写自己的accessKey,建议使用RAM角色管理的Key
<accessSecret>:填写自己的accessSecret,建议使用RAM角色管理的Secret

"""

from aliyunsdkcore.client import AcsClient
from aliyunsdkcore.acs_exception.exceptions import ClientException
from aliyunsdkcore.acs_exception.exceptions import ServerException
from leokim_function import *
from check_cnnect_network import *
import os
import time


while True:
    #判断存放IP的文件是否存在,不存在则创建
    if os.path.exists("./ip"):
        pass
    else:
        wirte_to_file("./ip","0.0.0.0")

    client = AcsClient('<accessKeyId>', '<accessSecret>', 'cn-hangzhou')

    if(connect_code() == 200):
        #通过函数获取外网ip
        ip = get_internet_ip()
        #print(ip)
    else:
        time.sleep(5)
        continue

    #下面开始对比ip,如果ip与之前记录的ip一致,则不执行任何操作,如果ip有变化,则会更新本地存储文件和更新域名解析
    with open("./ip", 'r') as f:
        old_ip = f.read()
    if ip == old_ip:
        print("noupdate"+"\nnew_ip:"+ip+"\nold_ip:"+old_ip)
    else:
        #print("update"+"\nnew_ip:"+ip+"\nold_ip:"+old_ip)
        wirte_to_file("./ip",ip)
        des_relsult = Describe_SubDomain_Records(client,"A","rpi.sgl1885.com")
                #判断子域名解析记录查询结果,TotalCount为0表示不存在这个子域名的解析记录,需要新增一个
        if des_relsult["TotalCount"] == 0:
            add_relsult = add_record(client,"5","600","A",ip,"rpi","sgl1885.com")
            record_id = add_relsult["RecordId"]
            print("域名解析新增成功!")
        #判断子域名解析记录查询结果,TotalCount为1表示存在这个子域名的解析记录,需要更新解析记录,更新记录需要用到RecordId>,这个在查询函数中有返回des_relsult["DomainRecords"]["Record"][0]["RecordId"]
        elif des_relsult["TotalCount"] == 1:
            record_id = des_relsult["DomainRecords"]["Record"][0]["RecordId"]
            update_record(client,"5","600","A",ip,"rpi",record_id)
            print("域名解析更新成功!")
        else:
            record_id = 0
            print("存在两个子域名解析记录值,请核查删除后再操作!")
        path = './RecordId'
        wirte_to_file(path,record_id)
    time.sleep(10)

#!/usr/bin/env python
#coding=utf-8


"""
Priority(5):解析优先级,非必填
TTL(600):TTL值,默认600秒,非必填
Value("121.201.65.98"):记录值,必填
request.set_Type("A"):解析类型,A为解析成IPv4,如需解析根域名,填写@,必填
request.set_RR("www"):子域名,必填
request.set_DomainName("xiaoanran.club"):根域名,必填

返回值说明:
RecordId:解析记录ID,修改和查询域名时需要用到
RequestId:请求ID

"""
from aliyunsdkalidns.request.v20150109.AddDomainRecordRequest import AddDomainRecordRequest
from aliyunsdkalidns.request.v20150109.UpdateDomainRecordRequest import UpdateDomainRecordRequest
from aliyunsdkalidns.request.v20150109.DescribeSubDomainRecordsRequest import DescribeSubDomainRecordsRequest
import urllib
import json

#写入文件
def wirte_to_file(path,content):
    with open(path,'w') as f:
        f_name = open(path,'w')
        f_name.write(content)

#新增解析记录,返回json格式的数据
def add_record(client,priority,ttl,record_type,value,rr,domainname):
    request = AddDomainRecordRequest()
    request.set_accept_format('json')

    request.set_Priority(priority)
    request.set_TTL(ttl)
    request.set_Value(value)
    request.set_Type(record_type)
    request.set_RR(rr)
    request.set_DomainName(domainname)

    response = client.do_action_with_exception(request)
    #response = str(response, encoding='utf-8')
    relsult = json.loads(response)
    return relsult

#更新解析记录
def update_record(client,priority,ttl,record_type,value,rr,record_id):
    request = UpdateDomainRecordRequest()
    request.set_accept_format('json')

    request.set_Priority(priority)
    request.set_TTL(ttl)
    request.set_Value(value)
    request.set_Type(record_type)
    request.set_RR(rr)
    request.set_RecordId(record_id)

    response = client.do_action_with_exception(request)
    #response = str(response, encoding='utf-8')
    return response

#查询解析记录
def Describe_SubDomain_Records(client,record_type,subdomain):
    request = DescribeSubDomainRecordsRequest()
    request.set_accept_format('json')

    request.set_Type(record_type)
    request.set_SubDomain(subdomain)

    response = client.do_action_with_exception(request)
    #response = str(response, encoding='utf-8')
    relsult = json.loads(response)
    return relsult

#获取外网地址
def get_internet_ip():
    response = urllib.urlopen('http://www.3322.org/dyndns/getip')
    ip = response.read()
    return ip

将python脚本添加为centos7服务

树莓派上做的ddns要自启动

sudo  vim /usr/lib/systemd/system/myddns.service  

#这里myservice.service可以定义为自己想要取的名字。

[Unit]
Description=myddns Service
After=multi-user.target
[Service]
Type=idle
ExecStart=/usr/bin/python2.7   /root/hwx_aliyun_ddns/DDNS.py
[Install]
WantedBy=multi-user.target

更改文件权限

sudo chmod 644 /usr/lib/systemd/system/myddns.service
使配置文件生效
sudo systemctl daemon-reload     #重载服务列表
sudo systemctl enable myddns.service  #设置开机自启动
sudo systemctl start  myddns.service    #开启服务
sudo systemctl  status  myddns.service   #查看服务是否正常运行

或者重启查看能否自启动。
reboot

image.png

python 箭头键无效

Linux系统自带的python箭头和退格键都可以正常使用,自定义安装的python退格键和箭头不可以正常使用,会出现">>> daf ^H^[[D "这样的怪东西。

因为readline库的问题。那么解决的方法就是:

yum install readline-devel.*

然后再去重新configure、make 、make install python 就可以了。

​python3 pandas基本操作

#encodeing=utf-8
import numpy as np
import pandas as pd

s = pd.Series([i*2 for i in range(1,11)])
dates=pd.date_range("20170301", periods=8)
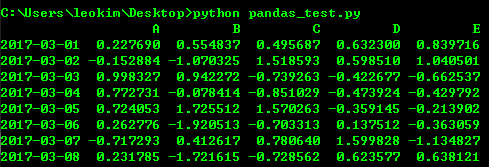
df=pd.DataFrame(np.random.randn(8,5),index=dates,columns=list("ABCDE"))
print(df)

随机生成8行5列 以dates作为index,ABCDE作为列

image.png

#打印前3行
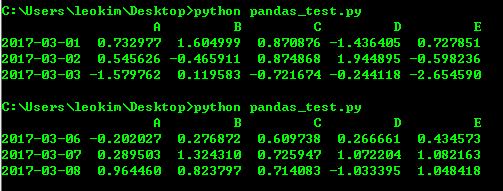
print(df.head(3))

#打印后三行
print(df.tail(3))

image.png

#打印索引值
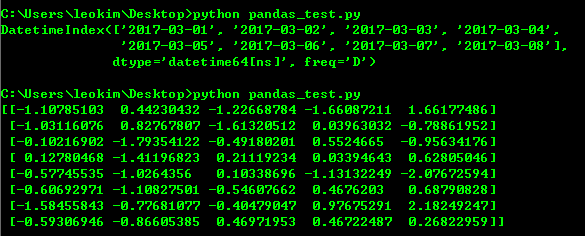
print(df.index)

#打印value
print(df.values)

image.png

#转制 索引和列转换
print(df.T)

image.png

print(df.sort(columns="C"))

我测试sort的时候尽然报错 可能是python3对排序重新定义了函数名

image.png

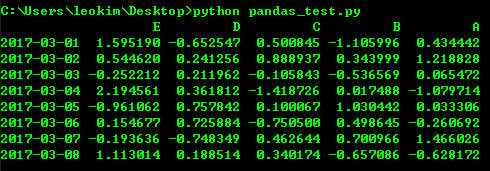
print(df.sort_index(axis=1,ascending=False))

image.png

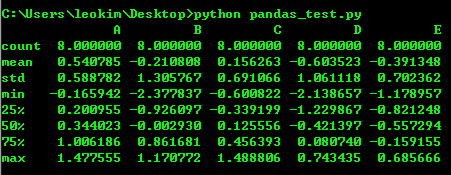
print(df.describe())

image.png

#切片
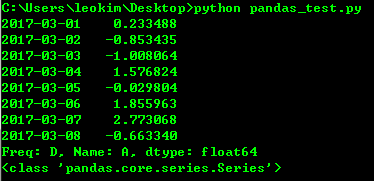
print(df["A"])
print(type(df["A"]))

image.png

print(df[:3])
print("=============================================================")
print(df["20170301":"20170304"])
print("=============================================================")
print(df.loc[dates[0]])

image.png

print(df.loc["20170301":"20170304",["B","D"]])
print("=============================================================")
print(df.at[dates[0],"C"])

image.png

#通过下标进行选择
print(df.iloc[1:3,2:4])

image.png

#填条件进行筛选
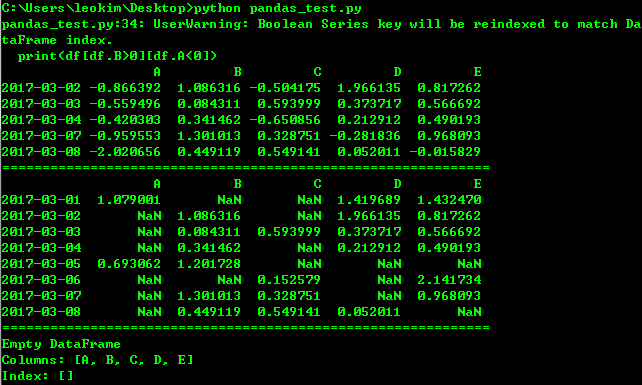
print(df[df.B>0][df.A<0])
print("=============================================================")
print(df[df>0])
print("=============================================================")
print(df[df["E"].isin([1,2])])

image.png

df.iat[1,1]=1
print(df)

df.loc[:,"D"]=np.array([4]*len(df))
print(df)

df2=df.copy()
df2[df2>0]=-df2
print(df2)
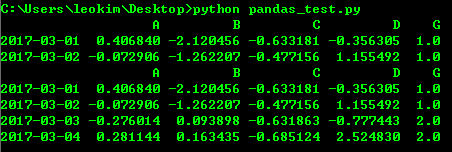
df1=df.reindex(index=dates[:4],columns=list("ABCD")+["G"])
df1.loc[dates[0]:dates[1],"G"]=1
# print(df1)

#丢弃NaN的行
print(df1.dropna())

#填充NaN
print(df1.fillna(value=2))

image.png

image.png

image.png

image.png

image.png

http://www.imooc.com/video/14994

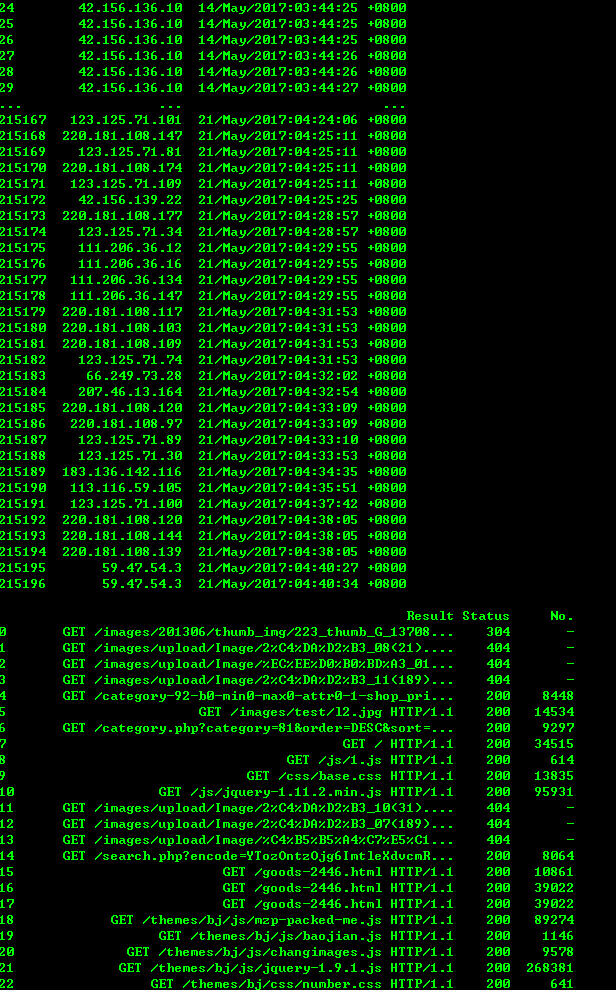
#encodeing=utf-8
import sys
import os
import re
import numpy as np
import pandas as pd
from pandas import Series, DataFrame, Panel

logfile = 'www.xxxxxx.com-access_log-20170521'

with open(logfile, 'r') as fo:
	log_list = []
	for line in fo:
		regex = '([(\d\.)]+) - - \[(.*?)\] "(.*?)" (\d+) (\d+|-)'
		rline = re.match(regex, line).groups()
		log_list.append(rline)

indexs=['IP','Time','Result','Status','No.']

df = DataFrame(log_list,columns=indexs)
print(df)
# print(df[df['IP'] == '42.120.160.97'])

image.png

像sql一样使用pandas 可以参考下面这篇文章

http://www.cnblogs.com/en-heng/p/5630849.html

python3 模拟登陆

import urllib.request, urllib.parse, urllib.error
import http.cookiejar

login_url = 'http://blog.leokim.cn/wp-login.php'
values = {'log':'xxxxxxx','pwd':'xxxxxxxxxxxxx'}
postdata = urllib.parse.urlencode(values).encode()
user_agent = r'Mozilla/5.0 (Windows NT 6.1; WOW64) AppleWebKit/537.36 (KHTML, like Gecko) Chrome/44.0.2403.157 Safari/537.36'
headers = {'User-Agent': user_agent, 'Connection': 'keep-alive'}

cookie_filename = 'cookie.txt'
cookie = http.cookiejar.MozillaCookieJar(cookie_filename)
handler = urllib.request.HTTPCookieProcessor(cookie)
opener = urllib.request.build_opener(handler)

request = urllib.request.Request(login_url, postdata, headers)
try:
    response = opener.open(request)
    page = response.read().decode()
    # print(page)
except urllib.error.URLError as e:
    print(e.code, ':', e.reason)

cookie.save(ignore_discard=True, ignore_expires=True)  # 保存cookie到cookie.txt中
print(cookie)

for item in cookie:
    print('Name = ' + item.name)
    print('Value = ' + item.value)


get_url = 'http://blog.leokim.cn/wp-admin/edit.php'  # 利用cookie请求访问另一个网址
get_request = urllib.request.Request(get_url, headers=headers)
get_response = opener.open(get_request)
print(get_response.read().decode())

用cookie直接访问

import urllib.request, urllib.parse, urllib.error
import http.cookiejar

cookie_filename = 'cookie.txt'
cookie = http.cookiejar.MozillaCookieJar(cookie_filename)
cookie.load(cookie_filename, ignore_discard=True, ignore_expires=True)

handler = urllib.request.HTTPCookieProcessor(cookie)
opener = urllib.request.build_opener(handler)

get_url = 'http://blog.leokim.cn/wp-admin/tools.php'
get_request = urllib.request.Request(get_url)
get_response = opener.open(get_request)
print(get_response.read().decode())

Python3 urllib使用方法

我自己码了一遍结果没注意浏览器返回上一页了 艹

直接复制粘贴了吧 再搞一遍太麻烦了

1、最简单

import urllib.request
response = urllib.request.urlopen('http://python.org/')
html = response.read()

2、使用 Request

import urllib.request
req = urllib.request.Request('http://python.org/')
response = urllib.request.urlopen(req)
the_page = response.read()

3、发送数据

#! /usr/bin/env python3
import urllib.parse
import urllib.request
url = 'http://localhost/login.php'
user_agent = 'Mozilla/4.0 (compatible; MSIE 5.5; Windows NT)'
values = {
'act' : 'login',
'login[email]' : 'yzhang@i9i8.com',
'login[password]' : '123456'
}
data = urllib.parse.urlencode(values)
req = urllib.request.Request(url, data)
req.add_header('Referer', 'http://www.python.org/')
response = urllib.request.urlopen(req)
the_page = response.read()
print(the_page.decode("utf8"))

4、发送数据和header

#! /usr/bin/env python3
import urllib.parse
import urllib.request
url = 'http://localhost/login.php'
user_agent = 'Mozilla/4.0 (compatible; MSIE 5.5; Windows NT)'
values = {
'act' : 'login',
'login[email]' : 'yzhang@i9i8.com',
'login[password]' : '123456'
}
headers = { 'User-Agent' : user_agent }
data = urllib.parse.urlencode(values)
req = urllib.request.Request(url, data, headers)
response = urllib.request.urlopen(req)
the_page = response.read()
print(the_page.decode("utf8"))

5、http 错误

#! /usr/bin/env python3
import urllib.request
req = urllib.request.Request('http://www.111cn.net ')
try:
urllib.request.urlopen(req)
except urllib.error.HTTPError as e:
print(e.code)
print(e.read().decode("utf8"))

6、异常处理1

#! /usr/bin/env python3
from urllib.request import Request, urlopen
from urllib.error import URLError, HTTPError
req = Request("http://www.111cn.net /")
try:
response = urlopen(req)
except HTTPError as e:
print('The server couldn't fulfill the request.')
print('Error code: ', e.code)
except URLError as e:
print('We failed to reach a server.')
print('Reason: ', e.reason)
else:
print("good!")
print(response.read().decode("utf8"))

7、异常处理2

#! /usr/bin/env python3
from urllib.request import Request, urlopen
from urllib.error import  URLError
req = Request("http://www.111cn.net /")
try:
response = urlopen(req)
except URLError as e:
if hasattr(e, 'reason'):
print('We failed to reach a server.')
print('Reason: ', e.reason)
elif hasattr(e, 'code'):
print('The server couldn't fulfill the request.')
print('Error code: ', e.code)
else:
print("good!")
print(response.read().decode("utf8"))

8、HTTP 认证

#! /usr/bin/env python3
import urllib.request
# create a password manager
password_mgr = urllib.request.HTTPPasswordMgrWithDefaultRealm()
# Add the username and password.
# If we knew the realm, we could use it instead of None.
top_level_url = "https://www.111cn.net /"
password_mgr.add_password(None, top_level_url, 'rekfan', 'xxxxxx')
handler = urllib.request.HTTPBasicAuthHandler(password_mgr)
# create "opener" (OpenerDirector instance)
opener = urllib.request.build_opener(handler)
# use the opener to fetch a URL
a_url = "https://www.111cn.net /"
x = opener.open(a_url)
print(x.read())
# Install the opener.
# Now all calls to urllib.request.urlopen use our opener.
urllib.request.install_opener(opener)
a = urllib.request.urlopen(a_url).read().decode('utf8')
print(a)

9、使用代理

#! /usr/bin/env python3
import urllib.request
proxy_support = urllib.request.ProxyHandler({'sock5': 'localhost:1080'})
opener = urllib.request.build_opener(proxy_support)
urllib.request.install_opener(opener)
a = urllib.request.urlopen("http://www.111cn.net ").read().decode("utf8")
print(a)

10、超时

#! /usr/bin/env python3
import socket
import urllib.request
# timeout in seconds
timeout = 2
socket.setdefaulttimeout(timeout)
# this call to urllib.request.urlopen now uses the default timeout
# we have set in the socket module
req = urllib.request.Request('http://www.111cn.net /')
a = urllib.request.urlopen(req).read()
print(a)

python 下载远程视频到本地

#!/usr/bin/env python
#-*-coding:utf-8-*-'
#Filename:download_file.py
 
import sys,os
import urllib.request
 
def urlcallback(a,b,c):
    """
        call back function
        a,已下载的数据块
        b,数据块的大小
        c,远程文件的大小
    """
    prec=100.0*a*b/c
    if 100 < prec:
        prec=100
    print("%.2f%%"%(prec,))
     
def main(argv):
    """
        main
    """
    print("start...")
    urllib.request.urlretrieve("https://bd.phncdn.com/videos/201210/15/6345721/vl_720_831k_6345721.mp4?ipa=47.52.4.119&rs=146&ri=1200&s=1495199710&e=1495206910&h=6a18d80e510cc3deb9f455d39c82931c"\
                      ,"1.mp4"\
                      ,urlcallback)
    print("end...")
     
if __name__=="__main__":
    main(sys.argv[1:])

猴子补丁(monkey patch)

monkey patch指的是在运行时动态替换,一般是在startup的时候.

用过gevent就会知道,会在最开头的地方gevent.monkey.patch_all();把标准库中的thread/socket等给替换掉.这样我们在后面使用socket的时候可以跟平常一样使用,无需修改任何代码,但是它变成非阻塞的了.

之前做的一个游戏服务器,很多地方用的import json,后来发现ujson比自带json快了N倍,于是问题来了,难道几十个文件要一个个把import json改成import ujson as json吗?

其实只需要在进程startup的地方monkey patch就行了.是影响整个进程空间的.

同一进程空间中一个module只会被运行一次.

下面是代码.


main.py

import jsonimport ujsondef monkey_patch_json():
	json.__name__ = 'ujson'
	json.dumps = ujson.dumps
	json.loads = ujson.loads

monkey_patch_json()
print 'main.py',json.__name__
import sub

sub.py

import jsonprint 'sub.py',json.__name__

运行main.py,可以看到都是输出'ujson',说明后面import的json是被patch了的.

最后,注意不能单纯的json = ujson来替换.