官方修改密码:(http://docs.gitlab.com/ce/security/reset_root_password.html)
具体方法如下:
1. 在root用户下,执行
-
获得用户数据,修改用户密码
注意:密码没有使用引号,奇怪的是使用单引号或双引号,密码就无效,估计是包含了这个字符,不包含,就没有问题。
3. 保存用户数据
注意需要使用后面的感叹号!
去芜存菁
官方修改密码:(http://docs.gitlab.com/ce/security/reset_root_password.html)
具体方法如下:
1. 在root用户下,执行
获得用户数据,修改用户密码
注意:密码没有使用引号,奇怪的是使用单引号或双引号,密码就无效,估计是包含了这个字符,不包含,就没有问题。
3. 保存用户数据
注意需要使用后面的感叹号!
gitlab 安装自带 nginx,如果想利用原有 nginx,可按如下操作:
8.0 版本 socket 文件位置有变动,感谢评论区的同学。
nginx 增加虚拟主机配置
# gitlab socket 文件地址
upstream gitlab {
  # 7.x 版本在此位置
  # server unix:/var/opt/gitlab/gitlab-rails/tmp/sockets/gitlab.socket;
  # 8.0 位置
  server unix://var/opt/gitlab/gitlab-rails/sockets/gitlab.socket;
}

server {
  listen *:80;

  server_name gitlab.liaohuqiu.com;   # 请修改为你的域名

  server_tokens off;     # don't show the version number, a security best practice
  root /opt/gitlab/embedded/service/gitlab-rails/public;

  # Increase this if you want to upload large attachments
  # Or if you want to accept large git objects over http
  client_max_body_size 250m;

  # individual nginx logs for this gitlab vhost
  access_log  /var/log/gitlab/nginx/gitlab_access.log;
  error_log   /var/log/gitlab/nginx/gitlab_error.log;

  location / {
    # serve static files from defined root folder;.
    # @gitlab is a named location for the upstream fallback, see below
    try_files $uri $uri/index.html $uri.html @gitlab;
  }

  # if a file, which is not found in the root folder is requested,
  # then the proxy pass the request to the upsteam (gitlab unicorn)
  location @gitlab {
    # If you use https make sure you disable gzip compression
    # to be safe against BREACH attack

    proxy_read_timeout 300; # Some requests take more than 30 seconds.
    proxy_connect_timeout 300; # Some requests take more than 30 seconds.
    proxy_redirect     off;

    proxy_set_header   X-Forwarded-Proto $scheme;
    proxy_set_header   Host              $http_host;
    proxy_set_header   X-Real-IP         $remote_addr;
    proxy_set_header   X-Forwarded-For   $proxy_add_x_forwarded_for;
    proxy_set_header   X-Frame-Options   SAMEORIGIN;

    proxy_pass http://gitlab;
  }

  # Enable gzip compression as per rails guide: http://guides.rubyonrails.org/asset_pipeline.html#gzip-compression
  # WARNING: If you are using relative urls do remove the block below
  # See config/application.rb under "Relative url support" for the list of
  # other files that need to be changed for relative url support
  location ~ ^/(assets)/  {
    root /opt/gitlab/embedded/service/gitlab-rails/public;
    # gzip_static on; # to serve pre-gzipped version
    expires max;
    add_header Cache-Control public;
  }

  error_page 502 /502.html;
}
禁用自带 nginx
vim /etc/gitlab/gitlab.rb
加入
nginx['enable'] = false
重启 nginx, 重启gitlab
systemctl restart nginx
sudo gitlab-ctl reconfigure
权限配置
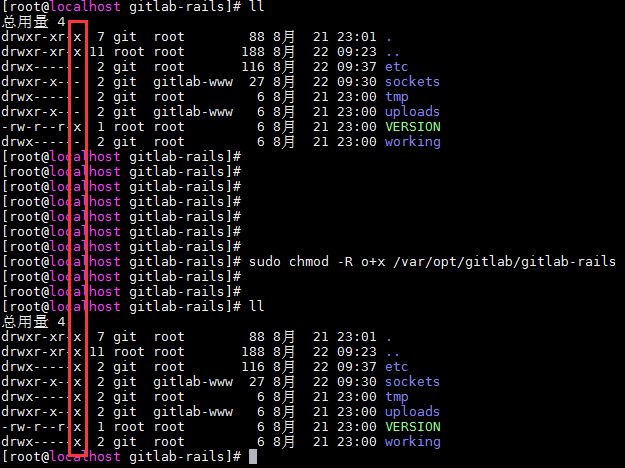
访问会报502。原本是 nginx 用户无法访问gitlab用户的 socket 文件,用户权限配置,因人而异。粗暴地(每次重启后都要执行一下 昨天困扰了一天):
sudo chmod -R o+x /var/opt/gitlab/gitlab-rails
我用的centos7 自带git
所以不需要安装如果安装可以执行以下命令
yum install -y git
创建一个git 用户 和 git 组
groupadd git
adduser git -g git
初始化git仓库:这里我们选择/data/git/learngit.git来作为我们的git仓库
cd /data/git
mkdir .ssh
chmod 700 .ssh
touch .ssh/authorized_keys
chmod 600 .ssh/authorized_keys
cd /homechown -R git:git git
要注意的是文件权限和所属用户。
(后续的git clone如果需要密码,很有可能是git用户没有访问authorized_keys文件的权限)
客户端创建秘钥并上传
我的是windows所以要使用git bash来执行
ssh-keygen -t rsa -C "my@leokim.cn"
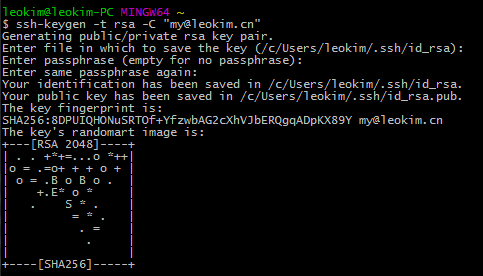
该命令会产生两个文件: id_rsa对应私钥,id_rsa.pub对应公钥。
将id_rsa.pub中的内容写到服务器的authorized_keys文件中。
如果有多个客户端,那么在authorized_keys文件中,一行保存一个客户端的公钥。
这里两点需要注意:第一,当你第一次使用Git的clone或者push命令连接GitHub时,会得到一个警告:
The authenticity of host 'github.com (xx.xx.xx.xx)' can't be established.
RSA key fingerprint is xx.xx.xx.xx.xx.
Are you sure you want to continue connecting (yes/no)?
这是因为Git使用SSH连接,而SSH连接在第一次验证GitHub服务器的Key时,需要你确认GitHub的Key的指纹信息是否真的来自GitHub的服务器,输入yes回车即可。
Git会输出一个警告,告诉你已经把GitHub的Key添加到本机的一个信任列表里了:
Warning: Permanently added 'github.com' (RSA) to the list of known hosts.
这个警告只会出现一次,后面的操作就不会有任何警告了。
如果你实在担心有人冒充GitHub服务器,输入yes前可以对照GitHub的RSA Key的指纹信息是否与SSH连接给出的一致。
第二,这里提示你输入密码才能clone,当然如果你知道密码,可以键入密码来进行clone,但是更为常见的方式,是利用SSH的公钥来完成验证。
Git服务器打开RSA认证
然后就可以去Git服务器上添加你的公钥用来验证你的信息了。在Git服务器上首先需要将/etc/ssh/sshd_config中将RSA认证打开,即:
1.RSAAuthentication yes
2.PubkeyAuthentication yes
3.AuthorizedKeysFile  .ssh/authorized_keys
这里我们可以看到公钥存放在.ssh/authorized_keys文件中。所以我们在/home/git下创建.ssh目录,然后创建authorized_keys文件,并将刚生成的公钥导入进去。
然后再次clone的时候,或者是之后push的时候,就不需要再输入密码了:
禁用git用户的shell登陆
出于安全考虑,第二步创建的git用户不允许登录shell,这可以通过编辑/etc/passwd文件完成。找到类似下面的一行:
git:x:1001:1001:,,,:/home/git:/bin/bash
最后一个冒号后改为:
git:x:1001:1001:,,,:/home/git:/usr/bin/git-shell
这样,git用户可以正常通过ssh使用git,但无法登录shell,因为我们为git用户指定的git-shell每次一登录就自动退出。
git stash 可用来暂存当前正在进行的工作, 比如想pull 最新代码, 又不想加新commit, 或者另外一种情况,为了fix 一个紧急的bug, 先stash, 使返回到自己上一个commit, 改完bug之后再stash pop, 继续原来的工作。
基础命令:
$git stash
$do some work
$git stash pop
进阶:
Git stash save "work in progress for foo feature"
当你多次使用’git stash’命令后,你的栈里将充满了未提交的代码,这时候你会对将哪个版本应用回来有些困惑,
’git stash list’ 命令可以将当前的Git栈信息打印出来,你只需要将找到对应的版本号,例如使用’git stash apply stash@{1}’就可以将你指定版本号为stash@{1}的工作取出来,当你将所有的栈都应用回来的时候,可以使用’git stash clear’来将栈清空。
git stash # save uncommitted changes
# pull, edit, etc.
git stash list # list stashed changes in this git
git show stash@{0} # see the last stash
git stash pop # apply last stash and remove it from the list
git stash –help # for more info
首先安装git
安装完之后在指定文件夹下使用
git init
初始化git 这样在文件夹下就会生成.git文件夹
在文件夹下创建一个新文件index.php
git status
查看版本状态
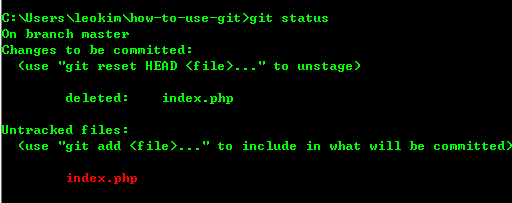
把index.php放入提交缓存区
git add index.php
git add 可以使用“.”来通配当前目录下的文件,
文件夹也可以使用例如“password_*”来匹配,
还可以在一个目录下使用"src/*.js"来通配目录下所有js文件
提交
git conmmit -m"提交描述"
最后可以查看记录
git log
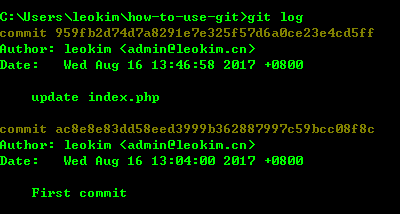
把git重置到 所提供hash值的时间点
git reset --soft ac8e8e83dd58eed3999b362887997c59bcc08f8c
soft 只把git 重置到hash值的时间点但是代码不变
hard 连同代码一起重置到hash值的时间点
查看
git show ac8e8e83dd58eed3999b362887997c59bcc08f8c
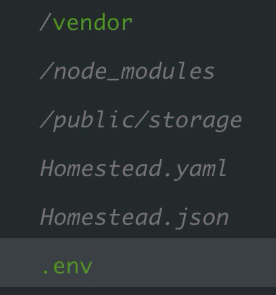
如果有一些文件或者文件夹不希望通过git提交 可以通过.gitattributes来屏蔽比如说laravel的里的.gitattributes
创建分支
git branch test-branch
切换分支
git checkout test-branch

创建分支并进入(效果等同以上2行)
git chackout -b test-branch
合并分支到master
git checkout master
git merge test-branch

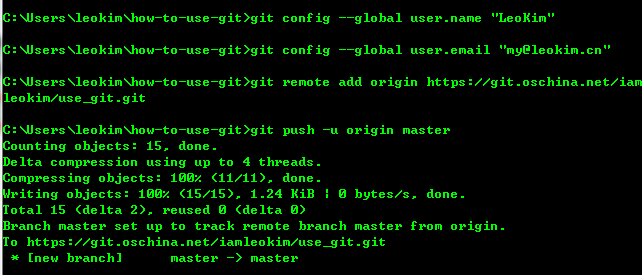
使用线上git平台挺方便的 创建好之后执行以下操作就可以了
仿JD
https://github.com/huangche007/vue-jd
vue的swiper
https://surmon-china.github.io/vue-awesome-swiper/
仿网易云音乐
https://link.zhihu.com/?target=https%3A//github.com/IFmiss/vue-cloud-music
仿饿了么
https://github.com/SimonZhangITer/VueDemo_Sell_Eleme
社区
https://github.com/Hxvin/vue-home
Vue 实例暴露了一些有用的实例属性与方法。这些属性与方法都有前缀 $,以便与代理的属性区分
今天学习了webpack 是从这里http://www.jianshu.com/p/42e11515c10f
里面有一些坑 比如我用webpack.config.js 才执行起来 和 loader: "json-loader"
notadd\vendor\notadd\framework\src\Module\ModuleManager.php
function getModules
/**
 * Modules of list.
 *
 * @return \Illuminate\Support\Collection
 */
public function getModules()
{
    if ($this->modules->isEmpty()) {
        if ($this->files->isDirectory($this->getModulePath())) {
            collect($this->files->directories($this->getModulePath()))->each(function ($directory) {
                if ($this->files->exists($file = $directory . DIRECTORY_SEPARATOR . 'composer.json')) {
                    $package = new Collection(json_decode($this->files->get($file), true));
                    $identification = Arr::get($package, 'name');
                    $type = Arr::get($package, 'type');
                    if ($type == 'notadd-module' && $identification) {
                        $provider = '';
                        if ($entries = data_get($package, 'autoload.psr-4')) {
                            foreach ($entries as $namespace => $entry) {
                                $provider = $namespace . 'ModuleServiceProvider';
                            }
                        }
                        if ($this->files->exists($autoload = $directory . DIRECTORY_SEPARATOR . 'vendor' . DIRECTORY_SEPARATOR . 'autoload.php')) {
                            $this->files->requireOnce($autoload);
                        }
                        $authors = Arr::get($package, 'authors');
                        $description = Arr::get($package, 'description');
                        if (class_exists($provider)) {
                            $module = new Module($identification);
                            $module->setAuthor($authors);
                            $module->setDescription($description);
                            $module->setDirectory($directory);
                            $module->setEnabled($this->container->isInstalled() ? $this->container->make('setting')->get('module.' . $identification . '.enabled', false) : false);
                            $module->setInstalled($this->container->isInstalled() ? $this->container->make('setting')->get('module.' . $identification . '.installed', false) : false);
                            $module->setEntry($provider);
                            if (method_exists($provider, 'alias')) {
                                $module->setAlias(call_user_func([$provider, 'alias']));
                            } else {
                                $module->setAlias([$identification]);
                            }
                            method_exists($provider, 'description') && $module->setDescription(call_user_func([$provider, 'description']));
                            method_exists($provider, 'name') && $module->setName(call_user_func([$provider, 'name']));
                            method_exists($provider, 'script') && $module->setScript(call_user_func([$provider, 'script']));
                            method_exists($provider, 'stylesheet') && $module->setStylesheet(call_user_func([$provider, 'stylesheet']));
                            method_exists($provider, 'version') && $module->setVersion(call_user_func([$provider, 'version']));
                            $this->modules->put($identification, $module);
                        } else {
                            $this->unloaded->put($identification, [
                                'authors'        => $authors,
                                'description'    => $description,
                                'directory'      => $directory,
                                'identification' => $identification,
                                'provider'       => $provider,
                            ]);
                        }
                    }
                }
            });
        }
    }

    return $this->modules;
}
这个function 获取到所有的module
我想一定是系统初始化的时候初始化了每一个module 所以才能注册到module的route
一直想找notadd的后台时如何创建路由的,结果一直没有找到
今天总算是让我找到了
一下记录一下步骤
获取所有路由列表
php notadd route:list > D:route.txt
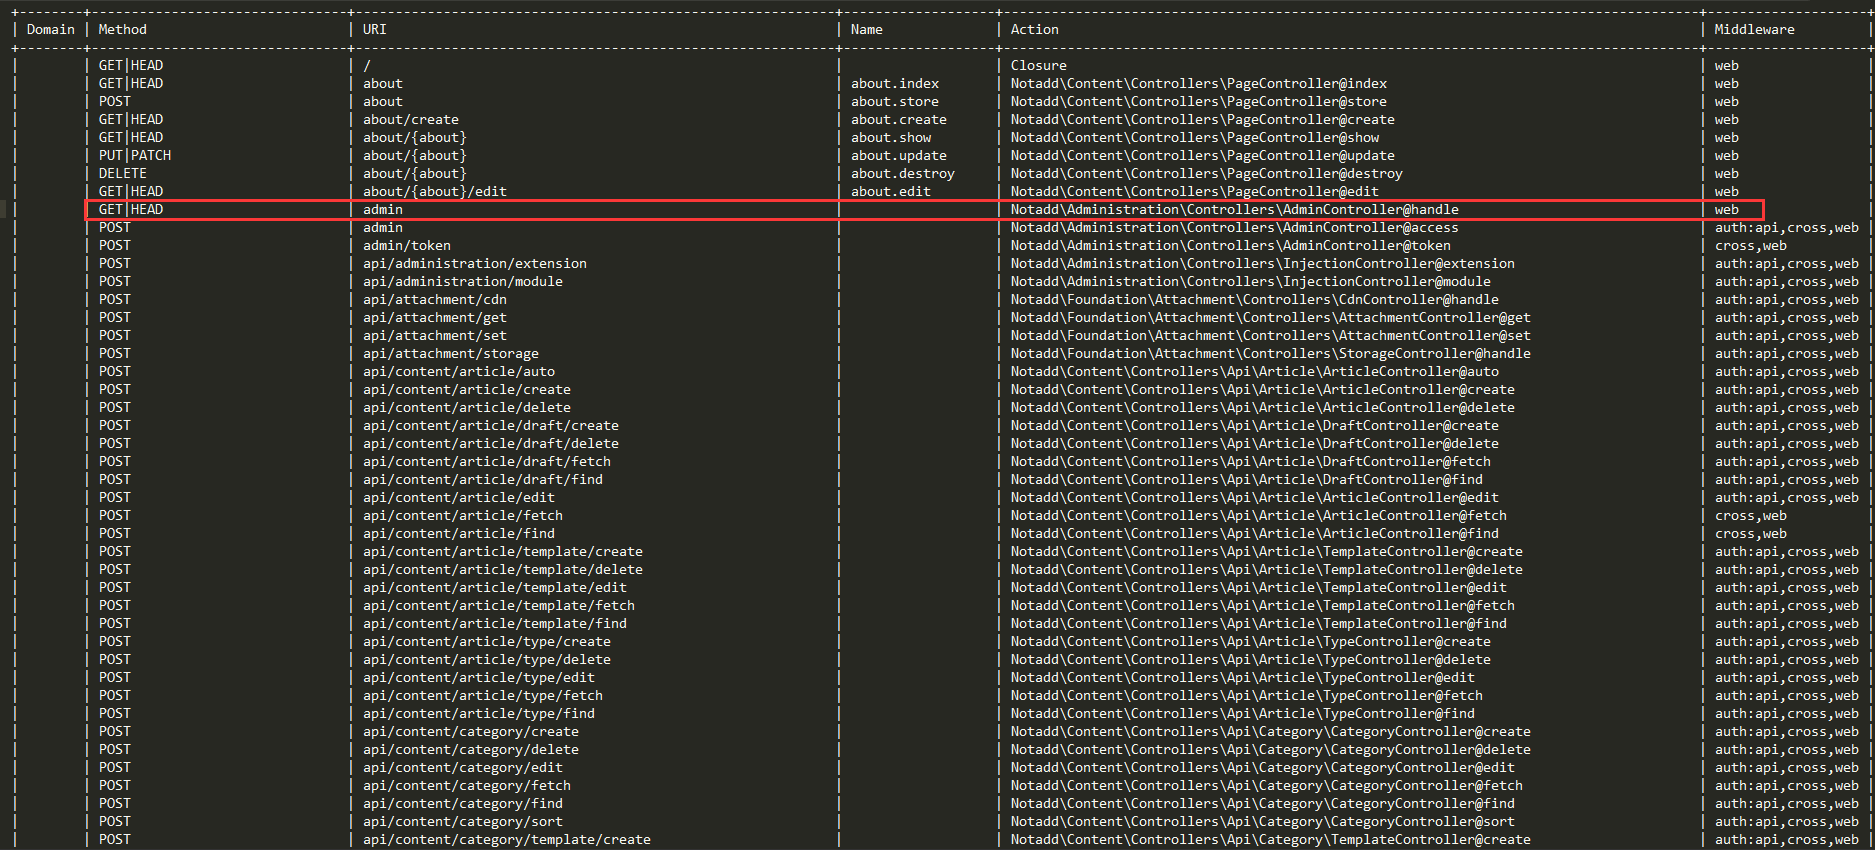
发现是在Notadd\Administration\Controllers\AdminController这个文件里定义的
我打开notadd\modules\administration\src\ModuleServiceProvider.php
看到ModuleServiceProvider的boot function是这样的
/**
 * Boot service provider.
 *
 * @throws \Illuminate\Contracts\Container\BindingResolutionException
 */
public function boot()
{
    $administrator = new Administrator($this->app['events'], $this->app['router']);
    $administrator->registerPath('admin');
    $administrator->registerHandler(AdminController::class . '@handle');
    $this->administration->setAdministrator($administrator);
    $this->app->make(Dispatcher::class)->subscribe(CsrfTokenRegister::class);
    $this->app->make(Dispatcher::class)->subscribe(PermissionGroupRegister::class);
    $this->app->make(Dispatcher::class)->subscribe(PermissionModuleRegister::class);
    $this->app->make(Dispatcher::class)->subscribe(PermissionRegister::class);
    $this->app->make(Dispatcher::class)->subscribe(PermissionTypeRegister::class);
    $this->app->make(Dispatcher::class)->subscribe(RouteRegister::class);
    $this->loadTranslationsFrom(realpath(__DIR__ . '/../resources/translations'), 'administration');
    $this->loadViewsFrom(realpath(__DIR__ . '/../resources/views'), 'admin');
    $this->publishes([
        realpath(__DIR__ . '/../resources/mixes/administration/dist/assets/admin') => public_path('assets/admin'),
        realpath(__DIR__ . '/../resources/mixes/neditor')                          => public_path('assets/neditor'),
    ], 'public');
}
重点是这几行

我不知道registerPath和registerHandler是做什么用的,那么我向上追溯到了notadd\vendor\notadd\framework\src\Administration\Abstracts\Administrator.php
/**
 * Init administrator.
 *
 * @throws \InvalidArgumentException
 */
final public function init()
{
    if (is_null($this->path) || is_null($this->handler)) {
        throw new InvalidArgumentException('Handler or Path must be Setted!');
    }
    $this->router->group(['middleware' => 'web'], function () {
        $this->router->get($this->path, $this->handler);
    });
}

/**
 * Register administration handler.
 *
 * @param $handler
 */
public function registerHandler($handler)
{
    $this->handler = $handler;
}

/**
 * Register administration route path.
 *
 * @param string $path
 */
public function registerPath($path)
{
    $this->path = $path;
}
发现了这些代码,好吧 原来这个路由是在这里去绑定的······ 怪不得我开始怎么找也找不到呢
所以是吧/admin 绑定到了notadd\modules\administration\src\Controllers\AdminController.php 的 handle function
/**
 * Return index content.
 *
 * @param \Notadd\Foundation\Extension\ExtensionManager $extension
 * @param \Notadd\Foundation\Module\ModuleManager       $module
 *
 * @return \Illuminate\Contracts\View\View
 */
public function handle(ExtensionManager $extension, ModuleManager $module)
{
    $this->share('extensions', $extension->getEnabledExtensions());
    $this->share('modules', $module->getEnabledModules());
    $this->share('translations', json_encode($this->translator->fetch('zh-cn')));
    return $this->view('admin::layout');
}
所以在这些操作之前,一定有一个地方初始化了所有的module
我想找到这个地方